
|
|
||
|
|
|||

'Waffles'
says:
|
IMPORTANT: READ THIS BEFORE INSTALLING THE DEMO VERSIONS ...or read this while it's downloading.... 1) Do a Disk Cleanup - 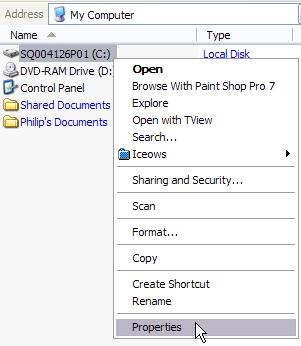 If you haven't done a 'Disk Cleanup' in a while on your system, chances are that there are numerous old and obsolete files in the 'Temp' folder of your system. Some of these files may fail to be properly replaced with our installer's versions if they happen to have the same name and are protected or locked. Other conditions may be encountered which make us recommend that you perform a Disk Cleanup:. Here's how easy it is to do that:
Note that there are several things that can be 'cleaned up'. For example, the temporary internet files saved by 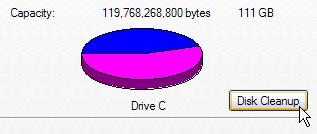 Internet
Explorer. Another thing that can be used to regain some
wasted disk space is to compress old or unused files. We
don't recommend doing this at this time unless it turns
out you're in need of that added disk space, as some of
these actions will be quite time-consuming to complete
especially if you have a very large disk with many many
files on it. Internet
Explorer. Another thing that can be used to regain some
wasted disk space is to compress old or unused files. We
don't recommend doing this at this time unless it turns
out you're in need of that added disk space, as some of
these actions will be quite time-consuming to complete
especially if you have a very large disk with many many
files on it.Windows will check a few things that could be cleaned up (it doesn't do the actual cleaning up at this time). If you have a large disk and file compression enabled, this could take a few minutes. Be patient, it's worth the wait :-) Eventually you'll see a few check boxes with items that could be cleaned up. Be sure to check the 'Temp' folder - that's the one we're interested in cleaning up at this time. Then click OK and confirm that you wish to perform these cleanup actions. Don't be surprised if this will free up dozens of megabytes or even hundreds of MB of disk space. If you're using an older system on which a lot of software has been installed over the years, it is quite typical to find hundreds if not thousands of files were left in your Temp folder. It's time to remove them and do some house cleaning. 2) Take a Peek inside the Temp folder After the disk cleanup, check to make sure that there is no more file named 'Setup.exe' in the Temp folder, such as left behind from other installations long ago. The Temp folder can usually be found in C:\Documents
and Settings\<username>\Local Settings\Temp
where
<username> is your login name or account name. If you can't find such a folder, try 'Users'. If you can't find the 'Local Settings' folder in there, your Windows Explorer settings probably is set to hide hidden system folders. We recommend changing that, as there's no reason to be left in the dark about what's really on your system. Here's how to change that Folder option: 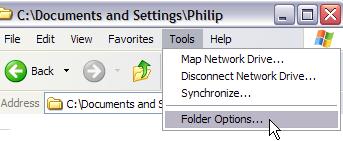 Select the Tools menu and 'Folder Options' in Windows Explorer's menu bar. 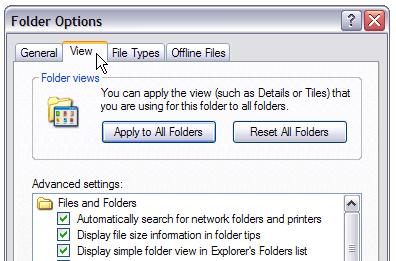 Then find the View tab in the Folder Options panel. 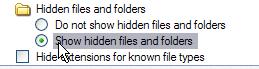 Locate the 'Hidden files and folders' category, and select 'Show hidden files and folders'  While we're at it, you
might also want to make sure that it doesn't hide the
extensions for known file types. If it is currently
checked, be sure to uncheck it. The file extensions
will help you better recognize which file is which.
For example, if you have a file named Setup.exe and
another Setup.lst, you will in fact now be able to see
the 3-letter extensions .exe and .lst behind the
basename. While we're at it, you
might also want to make sure that it doesn't hide the
extensions for known file types. If it is currently
checked, be sure to uncheck it. The file extensions
will help you better recognize which file is which.
For example, if you have a file named Setup.exe and
another Setup.lst, you will in fact now be able to see
the 3-letter extensions .exe and .lst behind the
basename.With that, you should be able to see the Local Settings folder and the Temp subfolder therein. That Temp folder should be almost empty after a disk cleanup. (it is possible for a few files to remain in there if they're locked by current processes) 3) During the Installation: select a 'Demo' folder The demo version installer may not pick a default installation folder that's different from the full version's default. We thus recommend that you install it explicitly into a demo folder that you will be able to distinguish from a full installation. During the installation, you may see a first phase where a great number of files are extracted (into the Temp folder), perhaps with a progress bar going to 100% (depends on the installer and version). Then a second phase will take you through the rest of the installation, and it will show the default target directory i.e. the destination folder for final demo perograminstallation of the . For example: C:\Program Files\Project Dogwaffle Professional or C:\Program Files\PD Pro or even C:\Program Files (x86)\Howler We strongly recommend that you add 'Demo' to the end of the folder's name, for the destination folder. So, if the default folder shown doesn't include 'Demo' then be sure to change it and add Demo to it. Recommended Examples: C:\Program Files\PD Pro Demo C:\Program Files (x86)\Howler Demo Otherwise, in some cases, you may have trouble installing the full version later (if purchased) over the same default folder, taken by the demo version. Depending on UAC or other permission settings, we have occasionally observed a failure to 'install on top'. |
|
|||||


