In traditional art, a technique known as glazing is commonly used by many artists to build up layers of paint on a paper or canvass. The result can give a brilliance to a painting that cannot be achieved by mixing paint all at once in a single application. This is because paints that are over mixed tend to become muddy.
 For
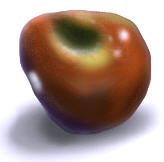
example, this apple image was painted originally in a grayscale
form, then color was added.
For
example, this apple image was painted originally in a grayscale
form, then color was added.
In traditional painting, the artist would let the first layer dry completely, then and only then would he start on the new layer, otherwise, his colors might begin to lift and blend with the new paint, ruining his painting.
 You
can see here the two layers of paint used to make this image.
You
can see here the two layers of paint used to make this image.
In our case we don't have to wait for paint to dry.
 The
layer panel on the sidebar helps us manage our separate layers of
paint, or images, or photographs, or text for that matter.
The
layer panel on the sidebar helps us manage our separate layers of
paint, or images, or photographs, or text for that matter.
Use the
![]() button to add a new layer. This new layer will become the
active layer. Only one layer is active at a time.
button to add a new layer. This new layer will become the
active layer. Only one layer is active at a time.
Use the
![]() button to remove the current layer.
button to remove the current layer.
Merging layers. When you have created an image with a number of layers, you may find it helpful to reduce the number of layers by merging some of them together. When you have finished with an image, you might even merge all the layers before saving the file. When you save a file with layers, only the current layer will be saved unless you use the special Layered format.
Use the
![]() button (merge) to merge all of the layers. They will be
merged using all of the layer settings as they are, so the results
will be the same as what you saw before merging.
button (merge) to merge all of the layers. They will be
merged using all of the layer settings as they are, so the results
will be the same as what you saw before merging.
Use the
![]() button (merge with next layer) merges your current layer with the
one underneath. Unlike merging all of the layers, this
function may alter the appearance of your image. Since you
are merging two layers together, it is not possible to keep layer
settings such as transparency from both layers. The
transparency from the top layer will be used when blending the two
images, but the transparency of the second layer will remain a
setting associated with the layer, and not become part of the
image until it is merged with another layer. This is usually
not a problem, but it is something to be aware of.
button (merge with next layer) merges your current layer with the
one underneath. Unlike merging all of the layers, this
function may alter the appearance of your image. Since you
are merging two layers together, it is not possible to keep layer
settings such as transparency from both layers. The
transparency from the top layer will be used when blending the two
images, but the transparency of the second layer will remain a
setting associated with the layer, and not become part of the
image until it is merged with another layer. This is usually
not a problem, but it is something to be aware of.
![]() Use
these two controls to change the positioning of layers in the
stack. The up arrow moves your current layer up by one, and
the down arrow moves it down by one.
Use
these two controls to change the positioning of layers in the
stack. The up arrow moves your current layer up by one, and
the down arrow moves it down by one.
Swap Mixing.
As covered in the section on the image menu, swap mixing if very similar to layer mixing, and it can be done right from the layer panel. If you find yourself using the swap image often, you may be comfortable using swap mixing by itself, and not involve yourself with a lot of layers.
The
![]() button swaps the current image with the swap image.
button swaps the current image with the swap image.
 You can see the association of the main and swap images on the
layer panel.
You can see the association of the main and swap images on the
layer panel.
 Right
clicking on the layers panel will give you a context menu with
several swap mixing options. You can activate swap mixing,
swap images, and merge the current layer with the swap image.
Right
clicking on the layers panel will give you a context menu with
several swap mixing options. You can activate swap mixing,
swap images, and merge the current layer with the swap image.
If you use swap mixing, it will bypass the regular relationship of layers. The swap image will become the bottom most layer. It otherwise functions just like a regular layer.
 This
drop-down control lets you select the size of the thumbnails shown
on the layer panel.
This
drop-down control lets you select the size of the thumbnails shown
on the layer panel.
Examples of small and jumbo thumbnails
![]()


 Right
clicking on the layer panel will give you a context menu with some
additional visibility options.
Right
clicking on the layer panel will give you a context menu with some
additional visibility options.