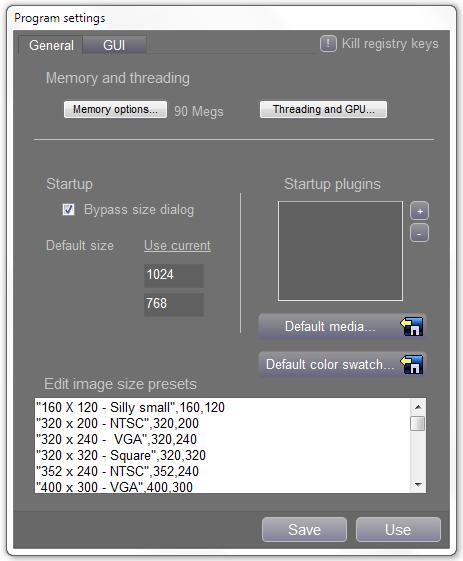
Settings
General tab
GUI
tab
|
|
The Settings panel lets you make alterations to the way your
program runs, and change the GUI (Graphics User Interface) to suit
your needs.
Most of the settings on this panel
need to be saved before taking effect.
You can also
reset all registry settings for the program from here. The
program will need to restart directly after doing so.
Howler Stores
the position of every tool panel when you exit the program.
It is possible for these settings to become corrupted in the
registry for various reasons, such as a changed screen resolution
may leave panels outside the viewable area, so deleting them may
solve errors with starting the program.
|
The
General Tab
 Memory options determines how much ram to set aside for the multiple
undos. If you're using a machine with less than 64 megs, consider
setting this to a lower value. Howler doesn’t otherwise
require a huge amount of ram, so if you have plenty, then set this to
a higher value and you'll be able to have more undos. For video
resolution images, 16-20 megs will often be plenty, but for higher
resolution images, you might consider using a higher value.
Beware though, that the program will allocate out whatever value you
give it, so using a value that is too high will effect your systems
performance. You'll have to save the settings if you want to
keep it. The setting will take effect the next time a new image
is created.
Memory options determines how much ram to set aside for the multiple
undos. If you're using a machine with less than 64 megs, consider
setting this to a lower value. Howler doesn’t otherwise
require a huge amount of ram, so if you have plenty, then set this to
a higher value and you'll be able to have more undos. For video
resolution images, 16-20 megs will often be plenty, but for higher
resolution images, you might consider using a higher value.
Beware though, that the program will allocate out whatever value you
give it, so using a value that is too high will effect your systems
performance. You'll have to save the settings if you want to
keep it. The setting will take effect the next time a new image
is created.
Undo memory should be balanced for the
type of work you do? Animators should reserve more memory for
animation frames, while photographers should use more undo memory.
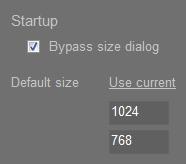 This setting lets you start the program without being asked for an
image size. You can specify an image size for the program to use
when it starts up.
This setting lets you start the program without being asked for an
image size. You can specify an image size for the program to use
when it starts up.
Default resolution presets
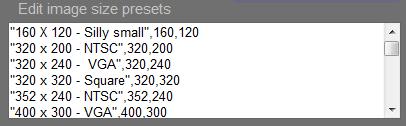
You
can edit your resolutions presets from the Settings panel.
These are the resolutions that are displayed when you start the
program or when you select a new image size or when you resize an
image.
The format of the text strings and parameters is as follows:
"320 x 200 - NTSC" A string that is displayed.
This string can be anything enclosed in quotes, but this format is
recommended.
Follow the string with a comma, the width, then
the height (in pixel) like this: ,320,200, so the full entry
would look like this:
“320 x 200 – NTSC”, 320,200
Be sure to save your settings when you
add an entry, or it won't be remembered next time you start the
program!
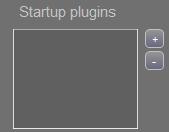 Startup plugin are plugins you select to run at startup. For
instance, you could run the Color Mixer plugin if you liked using
that feature a lot. A plugin could in theory be any executable file,
so long as it was named correctly, but usually programs written
specifically for Howler would be more appropriate.
Startup plugin are plugins you select to run at startup. For
instance, you could run the Color Mixer plugin if you liked using
that feature a lot. A plugin could in theory be any executable file,
so long as it was named correctly, but usually programs written
specifically for Howler would be more appropriate.
To add a plugin
at startup, click the
 button and select a plugin from the list that is presented. To
delete a plugin, select it from the list on the Settings panel, and
click the
button and select a plugin from the list that is presented. To
delete a plugin, select it from the list on the Settings panel, and
click the
 button. Remember that your settings on this panel have to be
saved to take effect.
button. Remember that your settings on this panel have to be
saved to take effect.
 A Startup Well File is the color scheme (Well) that is loaded in the
bottom of the tool panel at startup. You can alter the well at
any time with Drag and Drop, or by loading or creating a new one, but
this lets you load a custom Well file at startup.
A Startup Well File is the color scheme (Well) that is loaded in the
bottom of the tool panel at startup. You can alter the well at
any time with Drag and Drop, or by loading or creating a new one, but
this lets you load a custom Well file at startup.
To
save a well file, right click on the Mixer button on the bottom of
the tool panel, or use the
 Save well option under the utility menu.
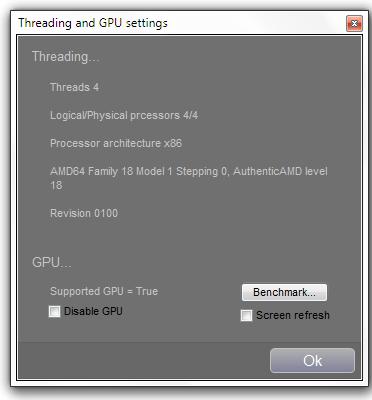

Threading and GPU (Graphics Processing Unit) settings let you
enable or disable GPU support, benchmark your GPU, and see the
current threading settings used by the program. Click “Benchmark”
to test the speed of your GPU. Checking the “Screen refresh”
checkbox will let you see the progress of the benchmark, but it may
throw off the results significantly.
You will be shown the speed of your GPU relative to your CPU. GPU
support required Windows 7 or later, and Direct x 11 or later to
operate, as well as drivers that support Microsoft C++ AMP.
There is no guarantee that your GPU is faster than your CPU, so it
is possible to disable the GPU if desired.
The GPU
Tab
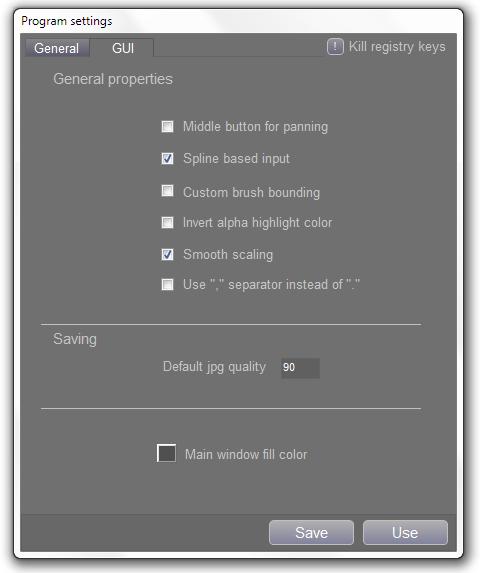
 Smooth scaling applies bi-linear filtering and halftone dithering if
appropriate to the screen refresh when working on a zoomed image. The
result is a smoother, nicer looking image at the expense of slightly
slower refreshes. Internally, the screen refresh takes place on
integer boundaries, so there may be some artifacts when painting
while scaled, but they clear up afterward.
Smooth scaling applies bi-linear filtering and halftone dithering if
appropriate to the screen refresh when working on a zoomed image. The
result is a smoother, nicer looking image at the expense of slightly
slower refreshes. Internally, the screen refresh takes place on
integer boundaries, so there may be some artifacts when painting
while scaled, but they clear up afterward.
 Spline based input smooths the input from a mouse or tablet as you
are drawing, to reduce segmentation caused by low sample rates of the
input device. If this option is not checked, you may experience
straight, segmented lines instead of smooth ones. This usually
happens with more with tablets, which often have a slower sampling
rate than mouses.
Spline based input smooths the input from a mouse or tablet as you
are drawing, to reduce segmentation caused by low sample rates of the
input device. If this option is not checked, you may experience
straight, segmented lines instead of smooth ones. This usually
happens with more with tablets, which often have a slower sampling
rate than mouses.
“Use the , separator instead of .” This option is for
countries that use a comma as a decimal separate. The program should
work correctly, but this option allows you to force this behavior if
needed.
“Custom brush bounding.” This option displays a
bounding box around custom brushes instead of an preview of the image
in the custom brush.
“Middle button for panning.” This option lets you pan
and zoom with the middle mouse button instead of opening the media
context menu.
“Default jpg quality.” This option lets you set the
default quality level when saving JPEG files. The original value is
80, but it can be set to anything from 10 to 100, with 100 being the
highest quality.
“Main window fill color.” This option sets the color
of the main window, which is what shows behind the image you have
loaded.