![]()
Animation
|
|
Today however, cells are often painted on a computer, and even the drawing process is starting to transition to computers. PD Pro will let you work whichever way is most comfortable to you. You can draw on paper and scan into a series of frames, or you can draw with a tablet right inside the program, and here are numerous tools to help you in the process. If you're not comfortable with drawing, there are even a couple of tools that will still let you get some artwork moving around on screen. You might be surprised by what you can accomplish! |
Animation -- Where to start?
|
Howler has a full animation sub system built in, with tools like onion skin, filmstrip, time-line, exposure sheet, brush keyframer, and more, but where does one get started with it all? The first question is simply -- what do you want to do? Are you interested in 2d animation, 3d animation, video editing? PD Pro's 2d features will let you create animation in the traditional way, on paper, or with a tablet directly inside the program. PD Pro's timeline will let you add effects and post process filters to 3d animations, as well as captured videos. You can even edit small segments by copying blocks around o the timeline. Do you want to create 2d animations without the hassle of drawing every frame by hand? The brush keyframer will let you pickup items from the screen and move them around, creating an animation. Are you a pro, but want the tools to ease your task? The exposure sheet lets you bring in audio to lip sync your characters. You can even playback your animation with the audio. |
Not only can you create new animations, but you can edit and process existing ones. you can reverse and re-time the frames of a animation, or apply effects from a rather long list, and even keyframe them. |
Animation -- The Big Idea!
Whatever camp you fall into, you will ultimately need to know what you want to animate.
|
Well, don't worry because we're right there with you. |
The first thing you need to be an animator is THE BIG IDEA. This idea can be anything, but it should preferably be something that's easy to draw and relatively entertaining. Typically, we will want to tell a story where something actually happens. There should be a beginning, where we meet our character, a middle where we find out what our character wants to do, and an end where our character finally realizes his dream or accomplishes his goal. This can take the length of a feature film to accomplish, or in our case, since we don't have millions of dollars, it can take a matter of minutes, or even seconds. |
|
What are your character's goals? What does he like the most? How would your character react if something hit him on the head? |
|
Telling a Story in Images
|
|
This example shows you how a single image can tell a story. What are the characters doing in this scene, and what are their emotions? Now, how would the scene change if we changed the emotions?
|
Tools of the Trade - When Staring with Paper
There are several ways to work with traditional animation in PD Pro. You can work from pen and paper, then scan in your work for final ink and paint, and composite. You can optionally work entirely inside the program, using a drawing tablet and the build in tools like onion skin and the exposure sheet. Let's begin by talking about working on paper, and the tricks of the trade...
|
Pencils, Paper, and Pencils... Oh My! |
|
|
It is distracting to stop and sharpen a pencil when your are in "The Zone," so start with a lot of sharpened 2B, HB, or #2 pencils. Have at least 6 or 7, but more are better. Non-photographic blue pencils are also helpful for rough sketches before cleaning up your work in lead. The blue doesn't copy on traditional photo-copying devices and becomes invisible. It is visible on modern scanning devices, but it is simple to remove it with a color adjustment filter or the Non-photo blue removal tool. That's a good reason for scanning in full color instead of grayscale. Be sure to use erasable colored pencils, as the traditional media used in colored pencils tends to be waxy and is hard to draw over in lead. |
A peg bar is an important tool for animators. You can get one from a number of animation supply sources, such as this popular brand.
Punched animation paper is next on our list. The paper will fit nicely onto our peg bar, so it can't move around and make our animation jumpy. A light weight paper is preferred. Any pre-punched animation paper will do nicely. you can also buy it un-punched if you have your own hole punch.
The peg bar is relatively inexpensive, however punched paper can be pricy. You can obtain a student grade peg bar that uses standard 3 hole paper. You can get a 3-hole punch at most office supply stores. |
|
Unless you are working in television, this may be overkill. you could simply create your own on a sheet of acetate, or just draw a box with a ruler on a piece of animation paper. |
A peg bar can be taped to the bottom of the light table so our paper can be kept in place. Once we place our animation paper on top, we should be able to see through several layers of paper. The lighter weight of paper you use, the better. 20 lb paper is just about as heavy as you can get away with. Animation paper is often referred to as 'Onion skin' because it is semi transparent, like the skin of an onion. This makes it easy to see your previous frames underneath your drawing.
|
|
|
An exposure sheet is a type of spreadsheet that lets you plan your shot frame by frame. Action and dialog, as well as notes from the animator are kept on this sheet throughout the animation process, starting with the director, and going all the way to the camera man. Exposure sheets are available from various animation supply stores on-line. PD Pro has it's own exposure sheet, complete with tools to help with breaking down audio into phonemes and playing audio with your animation. |
|
So, as you can see, there aren't a lot of tools you need to get started. The real difficulty in getting started in drawn animation, is the actual drawing. As with anything, the more you do it, the easier it will become. It is to our benefit, that the drawing ability of the animator is not as important as the ability to capture a sense of motion. If you spend too much time trying to perfect a single drawing, you will be disappointed when it flies by at 30 frames per second. At that rate, you won't even perceive individual drawings.
|
|
Character Design
|
The Model Sheet
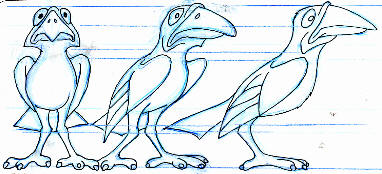
5 drawings are typical, a front view, a 3/4 view, a side view, a rear 3/4, and a rear view. In our case, we were lucky and we won't see the character from the rear. |
A model sheet helps us to understand our character, and draw him on-model. Here, we draw our character in a 'turnaround' This forces us to define rules for how our character is drawn, and where major features are located.
You can see how lines are projected through each drawing, showing how features line up. |
|
|
A construction sheet gives us written details on how a model is constructed. Our example tells us that 'The top of the beak is on the same level as the top of the head' and to 'Vary the placement of the sausage toes.' A construction sheet goes into many details on the exact steps to draw a character. It may start with two spheres, one for the body, and one for the head, then expand on the details such as where to put the eyes, nose, (or beak) etc.
|
The Storyboard
|
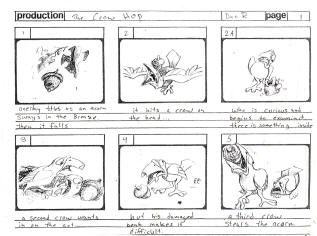
A storyboard lets you plan your film shot by shot. Here, the first panel is dedicated to shot 1. The text at the bottom of the panel tells us more about the shot. There may also be camera directions, or other information here. The next two panels describe shot 2. The first of the two panels is labeled 2, and the second is labeled 2a, and so on. The numbering goes on this way until the next shot starts. Every action that takes place is drawn on the board; nothing is left to the imagination. |
The Motion Graph
Whether working on paper, or with a tablet, the motion graph can be one of your best friends. Why draw anything until you actually know where it's going to be on every frame?
|
|
A motion graph is nothing more complex than a path that an object will follow. It is drawn on a single piece of paper and placed at the bottom of the stack on a light table, or it is placed on a layer inside PD Pro and becomes a reference for every frame of where an object will be placed. This is a very simple example of a motion graph. Here, it is the motion of a bouncing ball. Notice the tick marks. This is where the ball will be on every frame. Notice how the marks are closer together at the top. That is because the ball is slowing down as it reaches the top of it's arc, and speeding up as it starts to go back down. You don't need to draw all the frames of the animation when creating a motion graph. The tick marks are enough information to tell you where your shapes will be. Once the animation is complete, this page or layer can simply be discarded. |
Straight Ahead versus Pose to Pose Animation
|
There are two commonly used ways of animating. Straight ahead animation is when you start at the first frame and draw every frame in a sequence to the last frame. |
Pose to Pose animation is when you draw the most important poses, and then draw the in-betweens later. Pose to Pose animation can be very useful when working from dialog, when you want to capture the main expressions or posses that the character goes through while acting. It is also useful when working with a model. |
Frame Rates
|
The frame rate that you work at is a very important factor in the final quality of your animation. The frame rate determines how many frames per second are displayed when you playback your animation. If you set the frame rate too high, you have have to produce too many drawings. If you set it too low, your animation will look choppy. 12 frames per second (FPS) are recommended for drawn animation. This is one half of the frame rate used by film. This is referred to as 'drawing on twos' |
Typical Frame Rates 12 fps. The majority of cartoon animation is drawn on twos. When put on film, the frames are exposed twice to make 24 fps. In our case, we can simply play back at 12 fps. 15 fps. Less typical would be animation drawn for twos on video. 24 fps. Film 25 fps. Pal (European) Television. 30 fps. Black and White NTSC (US) Television. 29.97 fps. When color was added to the television standard, a slight adjustment had to be made to accommodate the extra signal used for color. The video still plays at 30 fps, but occasionally a frame has to be dropped to keep up. This is called 'Drop frame' |
Getting Started with 2D in Software.
|
Onion Skin
|
Once active, onion skin will help you in knowing where your drawings are going. If you're doing pose to pose animation, you will be able to see the pose in front of and behind your current frame. Now it is much easier to draw an in between frame. If you like, you can toggle the onion skin on an off as you work. There's also a keyboard shortcut -- 'l' (for light table) You can also move backward and forward in your animation by pressing the right and left arrow keys. |
Dialog
|
The Exposure Sheet
|
Even if working on paper, PD Pro's exposure sheet should come in handy for working with dialog. You can load in a wave file of your recorded dialog and scrub through it, synced with your animation frames. A icon image of various mouth poses appears at the left to help you with selecting the appropriate shapes. You can add comments for every frame in the list at the bottom. See the section on the Exposure sheet for more information. |
Working with Recorded Audio
|
If dialog exists for the shot you are working on, you will want to start by breaking down the beats of your dialog to determine what your character will be doing. Actual drawings for the mouth don't need to be done until the final stages of the animation, but having your character 'act' to what he is saying will help give your character personality. These beats, or important moments in the dialog will also indicate good points for key posses. Once you have your key posses, drawing in-betweens is much simpler. |
You can start by loading
a wave file into the exposure sheet and determining the frame rate
that you will be working at. You can select it from the
Timing menu. 12 frames per second is typical for drawn
animation. If you do not have a sound recording program and want to record dialog, Howler comes with a simple sound recording application that can be run from the exposure sheet under the Animation menu. |
|
|
|
Layout
|
Before any animation begins in a commercial animation studio, a specialized group of artists create layouts for the various shots in the project. A layout is a set of drawings for all the important actions or poses in shot. It will also include any props, scenery, and other items that need to be taken into account. |
All subsequent drawings that created will be based on a layout, so this is a very important step, even if your working on your own personal project. The drawings that are created for a layout will become your key frames when you start to animate. It is therefore a good idea to draw them on model, as they should appear in your final animation. Layout also insures that all your characters and props work together and there are no problems. Everything that you want to see onscreen will be taken into account. Only in between frames, and coloring are left out of this phase. |
Animating...
|
Now that we've covered the basics of animation, lets start thinking about working with animation inside of PD Pro. |
|
Once allocated, you will be able to view your frames. They will be empty when you create them, or rather, they will be a copy of your initial image. Assuming you started on a blank page, you're ready to start animating. |
|
Alternately, you may want to start with scanned frames or frames from a pencil test. In this case, see the section on scanning frames. |
Pencil tests...
|
You will almost never go straight from your initial drawings to a final animation in one go. Instead, you will probably find it useful to record an occasional Pencil test to see your work in progress. A pencil test is simply a quickly recorded version of your graphite drawings played in a way that will give you an indication of your final work. After viewing, you can make decisions on changes you want to make as you continue to work. |
There is absolutely no point in spending a tremendous amount of time scanning in a pencil test. Scanning through a flatbed scanner can take hours, or longer. Here are a few ideas of how you can capture a pencil test.
|
|
If you are animating inside of PD Pro, then there's no need to assemble a pencil test. Your animation is already ready for testing. Simply hit the play button the animation control panel. There's no need even to build a preview. |
On the one hand, you will save a lot of time not having to build pencil tests and scan your final work, but you may find working with a tablet difficult. It's really back pain versus wrist pain. |
The Principles
|
Now that we're ready to start animating, lets talk about the real meat-and-potato concepts of the art. |
|
|
Squash and Stretch
|
Anticipation Because we always want to relate to our subject, it is important to know what they are thinking, and what they are about to do next. Therefore, anticipation gives us a clue as to what is about to happen. Before jumping into the air, a character will crouch down, like a spring ready to go off. Only then, after a moment of hesitation to let the view see what's about to happen, does he jump. |
|
Follow-through Objects in the real world have mass and weight. An object that is moving in one direction will tend to try to keep moving in the same direction, and only when acted on by another force will it gradually start to move in a new direction. Elastic objects will show a lot of follow-through when they move. |
Ease In and Ease Out An object at rest tends to stay at rest, and an object in motion tends to stay in motion. Consider an automobile. A car does not go from 0 to 60 instantly. It takes a few moments to accelerate up to that speed. When it comes to a stop sign, it takes a few moments to slow to a stop. This is what is meant by ease in and ease out. |
|
Timing It's everything. Timing in animation happens in beats. A beat isn't an exact science -- It's usually whatever looks or feels right It is important in animation to let the view catch-up with what is happening on screen, therefore beats let the viewer absorb important moments before moving on. A cartoon coyote will pause for a moment as he realizes that he has just run off a cliff. There's no physical explanation of why he is able to hover in mid air, but cartoon timing demands it. |
Exaggeration Exaggeration doesn't necessarily mean that shapes are wildly distorted. What is does mean, is that important features, actions and emotions are highlighted to make them more pronounced. Animation is all about telling a story, and the more an important motion, or emotion is brought to the viewers attention, the more impact it will have. |
 Traditional
animation is accomplished with a series of drawings copied onto
transparent celluloid pages. These Cells are then hand
painted and overlaid on top of painted artwork, often watercolor
or gouache. The results can often be colorful and very life
like, exciting and even touching.
Traditional
animation is accomplished with a series of drawings copied onto
transparent celluloid pages. These Cells are then hand
painted and overlaid on top of painted artwork, often watercolor
or gouache. The results can often be colorful and very life
like, exciting and even touching.

 You've
dreamed about being an animator since before you can remember.
What are you, crazy or something?
You've
dreamed about being an animator since before you can remember.
What are you, crazy or something? Developing
the idea can be a lot of fun.
Developing
the idea can be a lot of fun.
 If
you've made it this far, then a storyboard helps you plan out your
movie, shot for shot.
If
you've made it this far, then a storyboard helps you plan out your
movie, shot for shot.

 This
might go without saying, but the first thing you'll want for
working with traditional drawn animation is pencils -- lots of
pencils.
This
might go without saying, but the first thing you'll want for
working with traditional drawn animation is pencils -- lots of
pencils. A
graticule (sometimes incorrectly called a field chart) can be
useful. It measures typical frame sizes and helps keep your
drawings inside a given area.
A
graticule (sometimes incorrectly called a field chart) can be
useful. It measures typical frame sizes and helps keep your
drawings inside a given area. A
light table is also a good idea. A light table is a box with
a semi-opaque surface and a light underneath. Many hobby
shops and art stores carry an inexpensive light table that is
great for people starting out in animation.
A
light table is also a good idea. A light table is a box with
a semi-opaque surface and a light underneath. Many hobby
shops and art stores carry an inexpensive light table that is
great for people starting out in animation. With
a light table, you will be able to see several layers of frames.
With
a light table, you will be able to see several layers of frames.
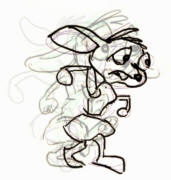
 A
character doesn't have to be terribly complex in order to be
entertaining.
A
character doesn't have to be terribly complex in order to be
entertaining.


 Much
like traditional animation paper on a light table, PD Pro will let
you see your drawings underneath your current image. You
activate this feature with the
Much
like traditional animation paper on a light table, PD Pro will let
you see your drawings underneath your current image. You
activate this feature with the


 The
first thing we need to do when working on any kind of animation
task, is initialize an animation with “Create” under
the Animation menu. This sets aside memory for a specific
number of frames. Don't worry if you don't know exactly how
many you'll need, because you can add and delete frames later if
you need to.
The
first thing we need to do when working on any kind of animation
task, is initialize an animation with “Create” under
the Animation menu. This sets aside memory for a specific
number of frames. Don't worry if you don't know exactly how
many you'll need, because you can add and delete frames later if
you need to. All
but the most rigid objects in motion tends to squash and stretch
as they move. A ball will compress when it hits the ground,
then become elongated when it shoots back up. It's always
important to remember to never change the volume of an object
though.
All
but the most rigid objects in motion tends to squash and stretch
as they move. A ball will compress when it hits the ground,
then become elongated when it shoots back up. It's always
important to remember to never change the volume of an object
though.