Original idea by Dan Ritchie

 |
|
|
Painting
Sky and Clouds Original idea by Dan Ritchie |
 |
 Project Dogwaffle has its own Sky generation system, accessible in the Filter menu: Filter
> Render > Sky...
There are enough parameters to create various moods, such as fog or haze towards the horizon, change the camera tilt, etc... [see example of sky filter used in nature painting] |
 The Gradient is used to modulate the colors of the clouds from their thin outer rims to their innermost solid centers. Varying the colors for reddish tints for example can dramatically alter the cloud's looks, such as adding a sunset atmosphere. |
 However, there are times when you want to paint your own, or add more dramatic clouds on top of this quick and easy sky system. The rest of this tutorial will show some easy ways to create your own additional clouds. |
 Start with a white canvas (main buffer) Select a soft and homogeneous brush such as a large airbrush. If you have a middle button or thumbwheel on your mouse you can click that in the buffer area to select the desired brush, or else you'll find the brush selector in the Tools palette. Later you could try variants with brushes which have some irregular features such as sponge dabs or other watercolor brushes. |
 Open the Brush Settings
panel (click upper-left icon in Tools palette) and set the Bleed value to fairly high.
This will cause effects similar to watercolors showing through.
Use a blueish color and paint the sky's background color. Be messy. Leave some "streaks" at an angle climing to the upper right perhaps to mimic fluffy high elevation cirrus clouds. The lower left part will mostly disappear behind clouds soon, so no worries there. |
| Another
way to start - If you'd like to have a transition of colors in
the background, such as from deep dark blue at the top towards greyish
haze at the horizon, try setting the gradient to the desired color
transitions, and then use the Line tool for a linear gradient (right
click on the line tool icon). Depending on the angle at which you place
the line for the gradient you could use that for a look in orbit around
Earth or from a hot air balloon. |
 Then
change both the main and
alternate colors to white or whatever your cloud's main dominant
color should be. We're now getting ready to draw the clouds.
(light grey could also play a role in future variants - experiment).
|
 Use
the Right mouse button to
paint the basic highlight part of the clouds. These should appear
fairly bright since they're at the edge of the clouds where the sun
still reaches albeit somewhat indirectly.
Remember, the alternate (right button) color has sort of an eraser effect. |
 Now
with the left button blend
the "inner" parts towards the edges which are bright. Use
circular
motions as if sweeping or mopping the floor. (or remember from when
watching mom do that chore :-)
Adjust the opacity for various levels of blending. You want to reach a level where it's almost like a smooth gradient from the inner parts towards the edges of the clouds. With some exceptions here or there of course, it's not all the same, it's turbulent and varied. |
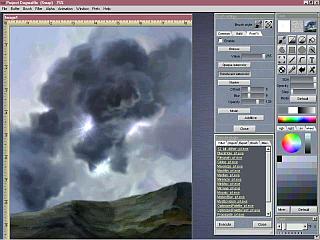
 Repeat this, alternating between left mouse and right mouse button to add a touch of lighter or reduce to darker blends. Soon you'll see layers of clouds stacked in front of eachother. If you use greyish tints instead of pure white you may give more of a thunderstorm atmosphere to it. A slight greenish tint will make it look like there's heavy hail up there. If you need some inspiration from tornado chasers, visit Klipsi and look for hail and other bad weather. |
 Add
a quick lens flare and Nova from the line tool, or use the more
sophisticated Radiant lens flare engine (menu:
Filter>Render>Radiant), and you'll soon see a Sun
disappearing on the edge of a bad
storm.
 You can remap the colors through the gradient, work with saturation, invert colors etc... suddenly the clouds are dark and the vanishing sky is light and bright. Adjust the dynamic range for more darkness and contrast, reduce the color saturation for a stormy greyish look , ... the sky's the limit :-) |
 |