
PD Pro tutorials:

Working with DigArts:
converting
Image Cells to Animated Sequences
| more tutorials: |
| PD Pro |
| PD
Particles |
| more
PD |
They can then be saved as a compact animated brush, or saved as a sequence of individual (numbered) image files, one file per image cell, or rendered into an animation through the Brush Keyframer to save it as an AVI file or do more with it.
To Probe further: Sprite Sheets for Game makers Excellent Image collections: DigArts at Gardenhose.com tutorial: DigArts & 3D with Carrara |
If you don't have it yet, extract the plugin from the zipped file and copy the plugin into the folder where your Project Dogwaffle installation resides, such as
C:\Program Files\PD Pro or
C:\Program Files\project dogwaffle
depending on where you installed your version.

We're going to open one such image cell array file. We're then going to extract the cells from it and pass them into a new custom, animated brush.
From there we can quickly save the image sequence from the brush to individual (numbered) image files, or to a single animated brush file. You can also use the BrushKeyframer of PD Pro to sequentially render the cells into a new animation.
go to menu:
File > Open...

Select your desired multi-image Targa file and open it.
Note that some of the other formats (Tiff, Png, Bmp) should also work, even if they contain an alpha channel, i.e. are 32-bit deep. If you have images in another format, try that and if it fails use a converter or PD Pro's batch converter.

You should see the animated 'marching ants' highlighting the alpha selection masks over each.
There is also some text in it, but it won't be seen or transfered into the sequence because it is not including an alpha channel on it, so just like the black background it will be remaining transparent once it is in the brush. You can thus annotate your images as you see fit, as long as an alpha channel component is going to prevent the annotations from being visible.

open the plugins panel from the Window menu, or use 'k' as the keyboard shortcut:
'k' is for k)iller plugins

Brush tab
The plugin we're looking for is near or at the top, listed in alphabetical order.
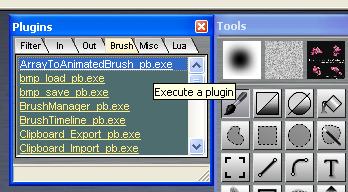
ArrayToAnimatedBrush_pb.exe
Double click it to launch it.

Enter the array's dimensions:
Number of images in x (horizontally, i.e. how many image cells per row), and number of images y, i.e. how many rows.
Enter the total number of images. In this case all 4 cells are used, but if there was one blank in the lower right corner we'd have just 3 image cells.
Click Ok.
This will extract the images and copy them into a newly created custom, animated brush.

menu:
Brush > Store/manage...
The doublequotes (") can be used as a quick keyboard shortcut.
You should see a thumbnail of the brush image, which is gently cycling through the sequence. (at 2 seconds intervals approx.)
(See left part of next image)

At the bottom of the stored brush, click
Show Filmstrip...
if you want to see the whole sequence of image cells.
When using this brush you can change its appearance of it with the sliders in the brush manager: Size and Rotation, hue/saturation/value as well as red/gree and blue tinting can be altered. The sliders affect a working copy, not the original image set. You can therefore easily get back to the originally created 'master' set by clicking 'Reset'.
Thus, if you scale it down to a very small size, such as 10x10 pixels only, you will see distinct pixelation in the preview. If you then scale back to full size or even larger thanh original size, you won't see oversized pixels, you'll see the original highres images being used as it is coming from the stored master.
This allows for quick re-use by Dogwaffle. You can save such animated brushes through the media manager (aka media pedia), accessible from the Window menu. That lets you easily find and re-use it later.
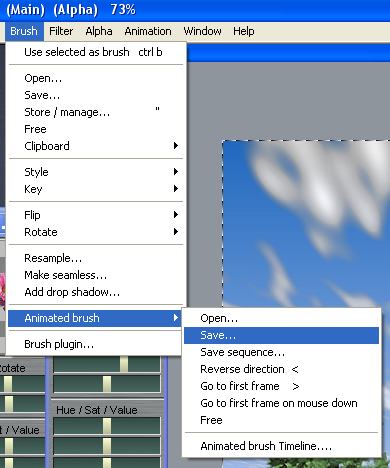
Another option in the same 'Animated brush...' submenu is to save the image sequence from the animated brush as a numbered sequence of image files. For example, if you give it the same base filename as the original targa had, you would see the creation of files named:
basename_0000.tga,
basename_0001.tga,
basename_0002.tga,
etc...
These images can then be used in a large variety of other applications like Bauhaus Mirage, TVPaint, ArtWeaver, Painter, the GIMP, PaintShopPro or Photoshop to name a few, and of course also as textures in 3D programs such as Carrara 5 with the surface replicator to disseminate lots of bushes and trees and other foliage all over the landscape..
Here are examples of what were produced with this technique:
| Three
Easy Steps to 'Digging' Art: converting a sheet of image cells
into a custom brush in 5 seconds or less. |
| 0. Preamble: before
starting to convert your multiple image sheets into brushes, open the
plugin panel to the Brush tab: ArrayToAnimatedBrush_pb.exe - Move
the panel down to the lower left so you can easily double-click the
plugin but the panel is not in the way. Also, open the Media Manager
from the Window menu, and move it to the lower right corner, with "+" button for easy access. You're
now ready to convert. |
| 1.
Open the Picture: Open the
desired picture (sprite sheet) containing the image cells,
with alpha channel holding the transparency mask: drag-and-drop, or use
File>Open... |
| 2. View All: Hit F4 to fit the image into the window
and see all image cells. Count how many rows and columns there are and
note if there are any empties near the lower right corner of the last
row. |
| 3.
Convert to Brush: Even if
Alpha is not toggled on, it should be 'active' and ready to use and
build the brush: double-click the plugin named ArrayToAnimatedBrush_pb.exe
and enter the number of columns of image cels in x and number of rows
in y, and total number of cells, usually x times y unless there
are some empties. |
| Optionally, save the brush in
Brush>animated brush>Save... or into the media manager, or if you
only need it temporarily store it with the brush manager
(shortcut: " ) - the preview should show with transparent background
(checkers) regardless of the secondary color, as it should have grabbed
the alpha channel for transparency masking. That's it - if you don't keep PD Pro's window full screen and ay out the folder view of sheets next to it for easy drag-and-drop, a single conversion will take just a few seconds and clicks. |
The Dogwaffle Animated Brush file:
Maggie-red-medium.anb
[size: 380 kb]
The extracted image cells:
Maggie-red-medium.zip
[size: 75 kb]
( numbered file sequence in a subfolder, zipped. The unzipped size is
374 kb)Sample 1:


Another example, using Sycamore images :

To Probe further:
Be sure to take a look at the
excellent image collections from
DigArts at Gardenhose.com
DigArts images in 3D with Carrara
DigArts images in 3D with Carrara