

Irfanview
& Dogwaffle Tutorial:
Screen captures for
timelapse movies
Screen captures for
timelapse movies
a few game developers
who like to waffle
| Rapid
3D Prototyping into 3D: draw a shape, and see it turn automatically into 3D Archipelis: Designer  Now for Windows, MacOS and iPhone!!! |
| Getting
started with Digital Painting on a slim budget:  PD Artist now $19! Draw, Sketch, Animate & Paint powered by Project Dogwaffle |
| Can't afford PD Artist at $19?  Someone else is willing to pay for your copy of PD Artist, if you buy something from them first - and there are many products and services to choose from! |
Can't afford Project Dogwaffle 2 at $29? Someone else is willing to pay for your copy of Project Dogwaffle, if you buy something from them first - and there are many products and services to choose from! |
 Poser 6 Collector's Edition Regular price: $229.95 Free shipping in the US! |
| Can't afford PD Particles at $19?  Someone else is willing to pay for your copy of PD Particles, if you buy something from them first - and there are many products and services to choose from! |
| Finally! 3D for everyone: Carrara (boxed) free shipping for orders $50 and up! (US only) Hurry before they're gone - this is a limited inventory blowout sale around $17 Carrara 3D Basics: so affordable!  around $40-$50 Carrara 3D Express: wow!  around $50-$60 Carrara 5 Standard: best value!  just around $100 Carrara 5 Pro: be a 3D Pro now!  |
|
I have experimented with timelapse
creation through Irfanview. It is easy, it's fun, it's free.
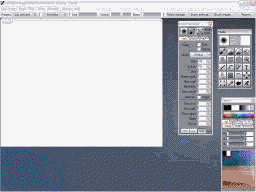
Prerequisite: You need Irfanview. Go to www.irfanview.com and download and install the latest version. Free for home use. It's a great image viewer, on steroids, it does much more than showing you the images. Lots more, trust me on this one. Download.com has it, millions of downloads. The most popular multimedia viewer. And you say you never heard of it? tsk tsk... what planet were you vacationing on? We'll use it to capture the screenshots at regular intervals, along with the cursor, into an image sequence. Configuring Image Capture with Irfanview You will need to create a folder into which to capture the image sequences, or use an existing one (don't save to the desktop, it will be littered with too many icons in no time)...... I recommend creating a folder in 'My Documents' or at top level of the drive like C:\capture
(create that folder first). Back in Irfanview you can hit 'c' for Capture. Or use menu:
Options > Capture
 This will show you the window to configure Captures:  Here's what to look for and set:
Start
Recording
Then start
recording: Click "Start" button. The Irfanview window will be minimized
and thus disappear. You can use ALT-Tab to switch back to it. Or find
it on the taskbar. At some point you'll need this to abort the
automatic capture.
You will hear a 'beep' every 10 seconds whenever it snaps a screenshot. turn down the volume if it's distracting. Then use your
favorite painting program and start painting, for minutes, or
even for hours. If you let the capture run for hours, watch the
disk space that's left available ;-) Stop and restart another capture later
if you take a break.
 Harnessing
the image captures
After a few
minutes or hours of painting, stop the Irfanview program.
Use Alt-Tab to switch to it or find it on the task bar at the bottom of the screen after closing Dogwaffle or whatever programs you used to paint. Then go to your
capture folder, for example C:\capture
where you will see hundreds of image files. They are named with the
timestamp of when they were recorded.
  Converting Image Sequence to AVI movie file Irfanview is
done now, although you could use Irfanview also to collect all captured
images into a slideshow which plays at 0.05 second intervals, i.e. 20
frames per second, and if your disk is fast enough, that would play
smoothly. Perhaps we'll do another tutorial on that method.
For now, let's use another program. You may have Quicktime Pro, use that. You may have Premiere or Vegas Video, use that.... many tools out there can load an image sequence and turn it into a movie file such as AVI or MPEG for easy playback. You could even load the sequence after proper renaming into a 3D program such as for an animated texture. We're going to use PD Pro to load the image sequence you want (try shorter sequences first, no need to select them all until you know you have enough memory and all that stuff. menu: Animation > Load Sequence...
 Select the capture folder, select the file type aka 'Pattern' (*.Jpg), select the desired images, and click the button in lower left to load these selected images.  Then resample
(resize) to make smaller.
menu> Image > Resample
 You can select from many preset sizes or enter your own. Just make sure if you use your own that the dimensions are not in conflict with the compression codec you'll use. Some codecs must have particular dimensions or the width and/or height must be multiples of 2, 4 or 8. Avoid odd dimensions.  You can preview (play) the movie in PD Pro, and change the speed with the FPS button (Frames per Second) on the animation toolbar:  Then save as AVI, with a good codec like DivX or Xvid or similar for small filesize compression.  You have a last opportunity here to set the playback rate (frames per second) 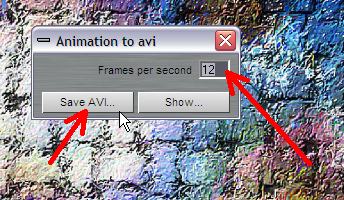 Then set the folder and filename to save it in such as movie.avi Finally it will ask you to choose a compression codec.  You might want to get the XP Codec pack from www.free-codecs.com like this one http://www.free-codecs.com/download/XP_Codec_Pack.htm or others such as Koepi's latest XVid build: http://www.free-codecs.com/download/Koepi_XviD.htm Here's an example: a conversion from the above saved AVI to Flash (done with another tool - Sourcetech's SoThink Flash Video converter.) You can also use
pre-existing codecs with lesser compression, save as AVI, and use the
free ffmpeg later to convert the
AVI to other formats like quicktime, Flash video (flv), Mpeg,....
(watch the requirements in frame rates!), MP4, WMV and others. ffmpeg
offers various controls to set the compression, such as:
-sameq ......... try to keep the same quality, whatever it takes -b ....................... set the bitrate (example: -b 600k ) -qscale ............... set the quality from a scale of 1 to 32, ex: -qscale 4 1 is best quality, same as '-sameq'. 4 is decent. 32 is very very blocky, but very small files in return. For example,
open a command window:
Windows Start
Menu > Run > cmd (type 'cmd' and hit
'Enter')
go to the capture folder: >
cd C:\capture
verify that the movie clip is here: >
dir movie.avi
use ffmpeg to convert it and change the frame rate to 25 fps, keep the same detail quality (sameq) and set the dimensions to 640x480 as well as convert to Mpeg1: >
ffmpeg -i movie.avi -r 25 -sameq -s 640x480 -f mpeg
movie.mpg
|
|
The Irfanview home is at www.irfanview.com read the Irfanview F.A.Q. |
| Sample timelapse
created with this tutorial: |
| Would
you like more tutorials like this one? |
Just ask Philip or browse our many free tutorials on PD Artist, PD Pro and PD Particles where you'll also see Irfanview and other great companion tools used as well |
 |
| Affordable 2D + 3D Software Animation Tools at lowest prices! Poser - Anime Studio - Carrara - Manga Studio - Bryce and much more from Purplus |
If you like PD Particles then you'll LOVE
PD Pro see what's new in v3.5 and free update patches even better, check: what's new in v4.1? |