|
|
PD Pro 6,
7, 8...
Installation Guides
Fast Digital
Painting, powered by Project Dogwaffle |
|
|
|
PD Pro 6,
7, 8...
Installation Guides
Fast Digital
Painting, powered by Project Dogwaffle |
|
|
|||||
 |
PD Pro 6
Installation Guide
This installation guide is meant to help you through the installation process. Not everybody knows the Windows environment inside and out, so perhaps this will be useful to some. No Download Accelerator Let me say that again: Don't use download accelerators. They can miss a few bytes, and furthermore, they often run multiple download as multiple threads at the same time. Those will all count against your maximum download attempts allowed. You could possibly exhaust your download permissions right on the first click if you run 6 or more threads of download acceleration! Just don't do it. Take the time for a clean and simple download. Now we assume that you already have downloaded the installer of PD Howler. You should not open it directly from your download link. Instead, you should save it to a known location on your local drive, such as the desktop or in My Documents. Anywhere is fine as long as you can easily get to it, and it's not in a compressed state. I If what you
download is a zip file, use Windows's Explore feature
to see the content and drag-and-drop the file from the
compressed folder view onto the desktop, then you're
ready to run the installer executable.
Run the Installer Double the installer
executable file, or select 'Open' from the right-click
menu. This should start the installer assistant (also
called the setup program). It will look a bit like this:
 Fig 1-1 Click Next > to
continue
Destination Folder
Select the folder where you want PD Howler to be installed. We will call this location the 'PD Howler installation folder', or 'Install folder' for short. If you're on a 32-bit version of Windows, try something like C:\Program Files\PD Howler or even just C:\Program Files\Howler Avoid installing it at the same location where you had a demo version installed first, if you did. If you're on a 64-bit version of the Windows operating system, then use the flavor with '(x86)' in the path, such as: C:\Program Files(x86)\PD Howler Just avoid installing over existing folders from older versions of Project Dogwaffle. Use a new location for PD Howler. 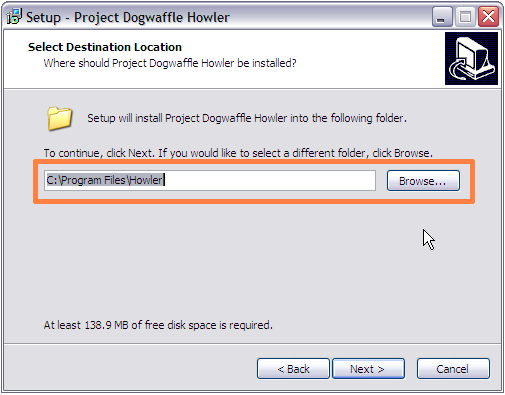 Fig 1-2
Click Next to continue In theory you can install it wherever you want. In practice it probably is a wise decision to stick with the default. However, if you must install it on top an existing folder, go ahead and click Yes when prompted:  Fig 1-3
If you had a demo version there, or a prior beta, you may have uninstalled that prior version, but there may still be a folder that was left over. In fact there may be a file or two left in it too. You should probably clear those (delete them) before continuing the installation. Just in case the installer has newer, better versions of the same files. Start Menu Folder The next step is to allow or prevent the addition of the start menu folder. We usually recommend you keep it enabled, leave the checkbox unchecked, simply click Next.  Fig 1-4
Click Next to continue
Desktop Icon, Quick Launch Icon It's almost a given that you will want to use PD Howler a lot. SO why slow you down? Why require two or more menu selections to get to the start menu, when you can just double-click the icon-thingy on the desktop? We recommend checking Create a desktop icon. If your QuickLaunch bar on the taskbar at the bottom of the screen is not already overfilling with other apps, you could also add it there. That's really your choice, your preference.  Fig 1-5
Click Next to continue
Ready to Install
You're only a few
seconds away now from creativity unleashed.
 Fig 1-6
Click Install to continue Installation in Progress There are quite a bunch of files that are included with PD Howler. Take a quick look while it's extracting and installing bthe files. Towards the end of the installation, there's also a few items that will be registered. That's an area where you could possibly see a problem, if the files already exist or are already registered and locked, perhaps by an overzealous antivirus program that prevents new registrations, or perhaps by UAC (User Account Trol). If you run into problems during this phase check the troubleshooting section  Fig 1-7 Dude, you're done!  Fig 1-8
The option for launching the program
is checked by default.
Click Finish to end the installation, and optionally launch PD Howler. Happy howling and waffling! |
Also check the F.A.Q. Also check Troubleshooting
|
|||


