Discovering
Bryce 5
Great 3D tools for PD Particles
Great 3D tools for PD Particles
| More Tutorials PD Particles Project Dogwaffle TheBest3D.com |
| This
tutorial is
based on a self-discovery experience, with Bryce 5. In
August 2006, Bryce 5.0 became available as a free download through a
promotion from its owner, DAZ at www.daz3d.com
- I had Corel's Bryce 5 from
before that, but this event gave me an incentive to learn a little more
about it. I had not used it much before, since Carrara was my primary 3D tool
of choice. This little intro tutorial is meant for first-time Brycers and in particular the many who have downlaoded the 5.0 free special and never done 3D before. Hopefully I can show them some ways to quickly adjust the highly customizeable interface to their needs. I think that one of the primary uses at first for a 2D artist using Photoshop, Paint Shop pro, Artweaver, Project Dogwaffle, Painter and similar tools will be to place a billboard-style rectangular polygon into the 3D scene and attach (map) a picture onto it, and then render it against a fancy backgrund sky or mountain scene. This is what we'll do. |
|
|||
 |
Dude, where's my Menu?! So, here we are, having just installed Bryce and launched it for the first time. What a strange, different user interface. No Menus? Well yes there are some, well get to that soon. They are auto-hiding. Why all that wasted black space around it? I don't know. But I know how to fix it. That's all that matters right now. Along the right side of the 3D view there's a bunch of icons and toggles. Look at the ones starting from the top. |
|||
 |
The Markup Tool The first such mini icon is a Demo marker, a markup tool for annotating. In fact, I clicked it and used it for this exact image to highlight it. Very convenient. When you're done marking up things, click the tool's icon again to toggle it off, or just hit any key like Space or whatever. |
|||
 |
The Tool Tip area Note also this very big helper: the help tool tip area. It is located in the lower left. Whenever you place your cursor over an icon, this area will guide you with a quick help indicator or description of the tool's name or purpose. Basically, I could say that my work is done here. You now have all the information you need to start exploring. The Tool Tip area will answer most questions like "what does *this* do?" But, it is in my nature to blabber on, so I'll stick around a little longer -) |
|
||
 |
Full Screen Mode Now we get to the first tool which we'll use to turn the display to full screen size. We've wanted to switch to full screen mode from the moment we launched Bryce (what, 3-4 minutes ago?) The 3rd icon from the top along the right side of the 3D view does just that. It's a Display toggle for full size. (note that the tool tip on this screenshot may not show the name as Display size toggle, but as the Demo Markup, since I used it for this screencapture). Click that icon to switch to fullscreen mode. |
|||
 |
Gimme Menus There, now we're talking. Now the display is in a more familiar full screen mode. But what abut the menus? When Mr. Kai Krause came out of hiding from his german castle, little did he know how many of us had gotten used and outright dependent upon the 'establishment' of menus at the top. By default, menus are not showing. But don't panic. Kai had a great idea, and if you're not ready for it yet, guess what, menus are available too. It is in auto-hide mode. If you move and rest the cursor near the top, it will show up as expected. You can probably find a way somewhere in the Preferences to turn auto-hide off for the menus, so they always stay there if you really need them all the time. |
|
||
 |
Rendering the first
(default) Scene We didn't really do much so far, in terms of 3D scene assembly, but there is already some default content in the 3D scene, with a simple cloudy sky. Let's see it, or in 3D lingo: let's render it! Along the left side below the navigation tools, you'll find the main trigger button for rendering the scene with current attributes and render settings. Click the render option to see your first rendering come to your screen. It will come in the form of a falling vertal curtain with several passes, first coarse, then more and more refined. You can use the Escape key to stop the rendering if it takes too long for your computer. There's by-the-way a small thumbnail preview of the rendering in the top-left area. Sometimes that's all you need for a quick impression. |
|||
 |
There
are of course many
options for defin ing the quality and other parameters of rendering. Notce the small grey triangles along theleft side of the 3D view? There are a few of them. They are on theright side of several navigation tools, such as next to the big trackball. There is one also next to the Render ball. Click that triangle and you'll see a menu of options for that tool, i.e. in this case for the Rendering, thus the Render options. The Quality submenu offers different levels of anti-aliasing quality. For your final production-quality rendering you may want to venture that way. If you have an old, slow system, you too may want to look into reducing the quality to make rendering faster. There are a *lot* of things to explore just right there, such as the 360-degrees panramic mode. |
|
||
 |
Basic Navigation Navigation is everything. A 3D world adds a little bit of complexity to working with your projects. Thus, it is very important to quickly find your favorite navigation tools which allow you to move into or out of a scene, pan around, turn your head and look around etc... and to reset the view too or switch to other cameras. There is a group of navigation tools like the trackball. There are also the little grey triangles with additional pullout menus. Click them once to see what's there. Return later as needed. There are several programs which like Bryce were once owned by MetaCreations and under development with a common interface: Bryce, Poser, Carrara. All of these popular 3D programs therefore still have similar trackball and other user interface items. They may also have some great keyboard shortcuts. Carrra for example has 'd' for dolly, and 'e' for examine. Unfortunately, since MetaCreations split and the various programs were acquiured by different companies, there is no straight consistency between these shortcuts, so they are different from one to the other. Still, you may want to research the doc of Bryce to see what shortcuts, if any, you can use to dolly, to examine (enter the scene), to pan, to orbit etc... because those are the tasks that you'll do a lot, and the faster you can learn to use both hands the easier things will get for you. |
|
||
 |
We
mentioned it already
earlier, but here it is again. There is a small preview render in the
upper left. The quality and time needed for it can be changed. Since the main view starts in a Wireframe mode, this can be a good feedback of where your scene is heading. You'll notice that while our scene has a simple sky, it doesn't have anything of significance on the ground. Let's change that by at least adding a reflective surface: water. |
|
||
 |
Inserting the First
Element - Water In the 'Create' room, there is a first icon that looks blue like water ripples. Click it and Bryce inserts a new water surface, shown as a small plane. It is limited in dimensions here in the interactive preview, but when rendered it extends indefinitely to the horizon. |
|||
 |
Do
you rendering, and
voila, we now have a simple water surface reflecting and dispersing the
sky colors. If that wasn't fun or justified the download of the free Bryce 5, I don't know what it will take. |
|||
 |
You
can insert other
object types. There's a plane for additional cloud layers. There's one
for solid grounds. There's also mountain (terrain) types and then
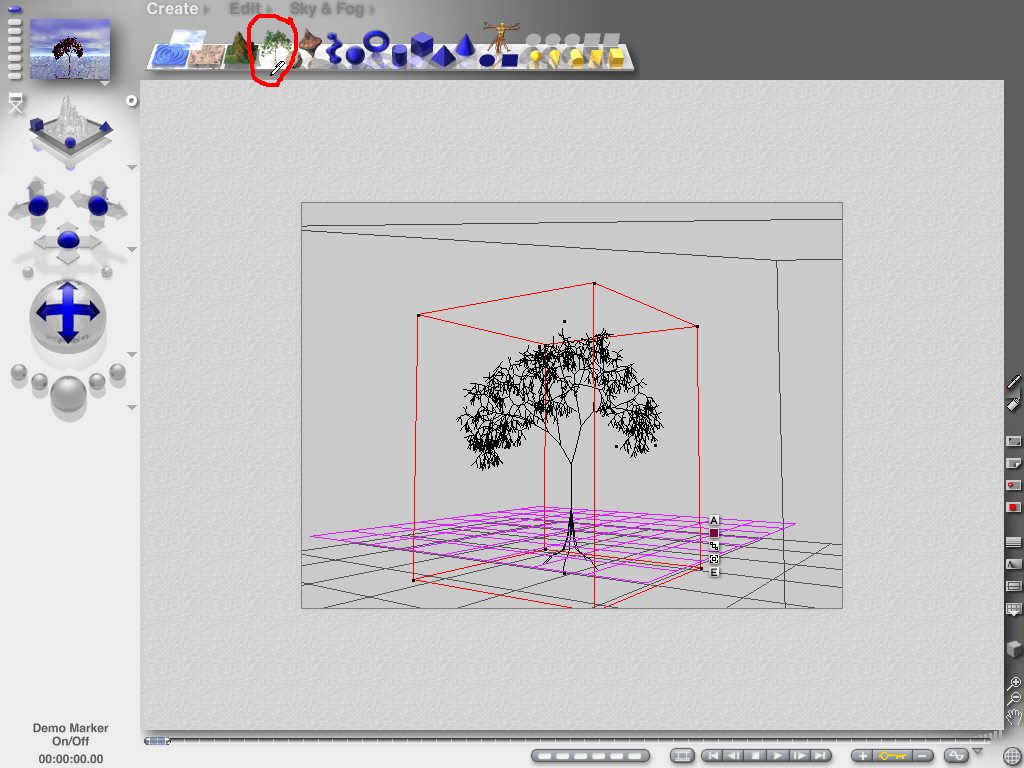
there's plants like trees. Click the tree object to insert one into the scene. |
|
||
 |
The
wireframe view will
show a simplified framework of the tree with manipulation handles. Grab the center top at the top of the bounding box and move the mouse sideways (out of the wrist) to adjust the vertical position of the top, thus making the tree grow larger or smaller. |
|||
 |
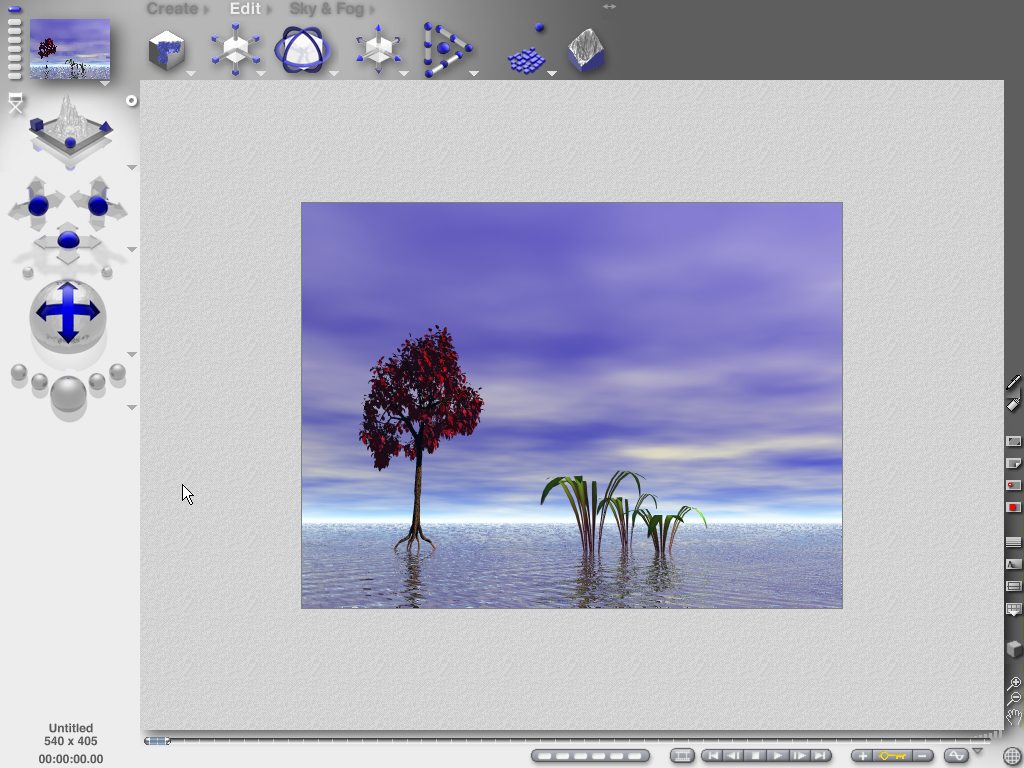
Render
again. The lone tree reflects on the water and scatters its dark trunk and leaves. |
|||
 |
For
aditional
manipulations, including resizing or rotations, switch to the 'Edit'
room. There are several object manipulators with access to transforming
the current object (the tree) in the various dimensions: X-axis,
Y-axis, Z-axis... |
|||
 |
Adding more Trees Go back to the Create room.
However, let's look at the general approach for creating/inserting new objects. Next to the Create room text string, there's a grey triangle for pulling out a dialog window that lets you choose other pre-defined objects to insert into the scene. |
|
||
 |
The
Presets includes a
variety of Booleans (geometric shapes), Mountains, Rocks and more. There are also various plants and trees. |
|||
 |
Select
for example Plant
#1. |
|
||
 |
You
can easily place
multiple copies of the same plant into the scene. Just seect one tree,
use Control-C to copy it, and Control-V to paste a second copy of it in
the scene. It will be at the exact same location, so you may not see
it, as it overlaps with the first tree. Click and drag the tree and you'll see the second instance of the plant. Use the manipulation tools to reposition them at various locations, sizes, and rotation angles. |
|||
 |
Here's
an example, with 3
copies of the same plant. |
|||
 |
Adding a Billboard
Rectangle (Image object) As a 2D imaging artist, one thing you'll likely be interested in doing is place a rectangular shape into the 3D scene and map a raster image onto it. These are sometimes called billboard polygons, and used in games for carrying signs, decals, and images of trees with transparency around the bracnhes, the trunk and the leaves. In the 'Create' room, click the icon which looks like Leonardo DaVinci's human symmetry study. Bryce calls it something like a Picture object. |
|
||
 |
This
type of object is
used to carry a picture. You can load several types: either a file for
the color channels and another for the transparency mask, or a single
file that contains both color and transparency, with the latter in the
alpha channel. |
|||
 |
To
add another choice to
the pre-existing image or the one that was added by inserting a Tree or
Plant, click one of the empty place-holders. |
|||
 |
Pick
a texture or photo or
image file you want to choose. In this example, we're selecting an image which was painted in PD Particles to create a tuft of grass. It's called 6onblue.tga and it's in Targa format, the preferred and default format for Project Dogwaffle and its sister products. It was saved in 32-bit depth, with the alpha channel carrying an opacity mask. |
|||
 |
Bryce
detects the alpha
channel and shows the various comonents: To the left, the color
channel, as seen through the opacity mask. Even though the original
image was rendered against a blue background, that background color
won't show here because the grass is opaque and the rest around it is
fully transparent. The middle image shows the greyscale image of the alpha channel found On the right side we see the combination of the two, with the familiar checker pattern showing what's transparent. Notice also that we now have several pre-loaded images ready to use. |
|
||
 |
When
you click the
checkmark to ok this choice, you'll see the rectangular polygon,
perhaps at an odd angle or small but in the 3D scene nonetheless. |
|||
 |
Use
the familiar
manipulation tools to re-orient it against the camera's view. |
|||
 |
Here
we have deleted some
of the multiple trees, and placed the picture polygon to the right
side. The rendering then shows the grass opaque, with lots of
transparency between the grass helms or twiggs, and the whole
thing reflecting on the water. |
|||
 |
Changing the Skies and
Lighting Next to the "Sky & Fog" room there is yet anotehr callout triangle. |
|||
 |
Click
it and you'll see
many presets of skies. Note that these don't just change a bacground
image. There are a lot of lighting effects that change with it, as well
as fog, haze, cloud elevation etc... One of the fun thing to do is experiment with the parameters directly, starting from a preset. But when you're against a tight production schedule, it's equally great just to have so many choices available. Below are three different renderings from the exact same view of the exact same scene. The only thing that changed was that we selected a different Sky preset. |
|||
  |
||||
 That's it, you're now ready to start exploring. As you learn and explore, be sure to visit Brycetech's tutorials, www.brycetech.com (now part of Daz3D). |
|
|||
| Ready to move
further with Bryce 5? |
|
|||
  |
Next,
learn how to: |
|
||