

Multiple Layered
Styles
| More Tutorials |
Intro
Video amongst
PWS's Facebook Videos Now also on YouTube |
| Finally! 3D for
everyone: Carrara (boxed) free shipping for orders $50 and up! (US only) Hurry before they're gone - this is a limited inventory blowout sale around $17 Carrara 3D Basics: so affordable!  around $40-$50 Carrara 3D Express: wow!  around $50-$60 Carrara 5 Standard: best value!  just around $100 Carrara 5 Pro: be a 3D Pro now!  |
|
Here's that Amapi rendering again.  This time, instead of double-clicking a Style from the Styles tab, use the drag-and-drop method. Note that as you position the cursor with the style close to the target layer, it will highlight to show possible drop targets. You can drop the selected style in various places around the existing layer. You can drop it below or under the layer:  Of course, we have only one layer at this stage, so there's not much to be gained from this. Alternatively, you can drop it directly onto the layer, essentially merging the style into it. 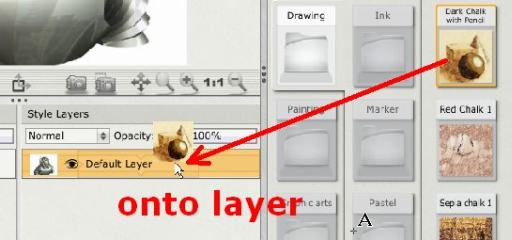 It's actually a little more subtle than that. If you position the cursor to the left edge or the right edge of the center drop region, you'll see that it's possible to highlight just the left or right portion of the yellow band. This will be explored in a later tutorial. For now, let's look at yet another drop zone: above. You can also drop the style above (i.e. over) the existing layer, creating a new style layer above it:  Go ahead and do that - drop the style named 'Dark Chalk with Pencil' above the default layer that gets created after importing your initial image into the project. |
|
|
| More Tutorials |