Fast
3D sketching, colormap, bumpmap and displacement map painting and
digital & sculpting:
Curvy 3D
the fun & intuitive way to
sculpt!
...it's not modeling, it's better:
It's
liberal sculpting!
Great for Fantasy Art, Concept Art & 3D Design, making 3D props, ...
Special discount coupons available for users of Project Dogwaffle! (ask
us)
|
Shop
at Purplus
for
more great Software & gadgets, games, security tools and
productivity solutions at lowest prices!
|
3D for everyone:
- easy -
- fast -
- affordable! -
Discover
Carrara

new version 8 and many more versions, some very
heavily discounted!
|

The perfect marriage:
|
|
One
of the great new features introduced with Curvy 3D version 2.0 is Image Based Modeling.
In this technique, you can sketch much of the final object's shape in a
raster paint program. You can use many different tools such as
Photoshop, Project Dogwaffle
Professional, PD Artist, the
GIMP, ArtWeaver, Twistedbrush, even MS Paint.
You can even use vector drawing tools such as Illustrator, as long as
you export the final render to a 2D raster image format in BMP file
format (Windows Bitmap)
Here's an example of what you need to do: paint or draw the shape as a
plain white solid shape on a black background.

Make sure that the black background is truly fully black (RGB is zero
each). The white parts in the image will then be interpreted by Curvy
3D as the solid parts of the 3D model to be constructed. The black
parts remain invisible, transparent.
If there are multiple white parts in the picture but they are
disconnected, they can then be separated (exploded) into several
indipendent objects. This is a great way to quickly create multiple
parts from a single image file containing sketches of each part. We
will explore this in a separate tutorial. Let's start with the basics.
In the above image example, you might recognize perhaps a blade for a
weapon in medievial times, perhaps for use in a game. In fact, with the
Bryce May Challenge models, this image was used to make the wings of
the dragon. I know, these wings seem awefully small, narrow, and you've
got to wonder how that poor dragon might stay aloft with so little
carrying surface. Well, at least he'll stay in shape, having to bat
those wings all the more quickly.
If you're interested in following this tutorial, here is a copy of the
original BMP file. The blad wings are rotate 90 degrees in that
original. It doesn't really matter. What matters is that it be a BMP
file. We have zipped it up into a compressed folder to make it smaller
and faster for you to download:
The original (extracted) BMP file is 1.5 MB in size(!)
Ok then, start Curvy 3D 2 and let's see how to turn this image into a
3D model in just a few clicks.
Here is where it all starts: Inflate Image
Select the inflate image option in the Model menu.
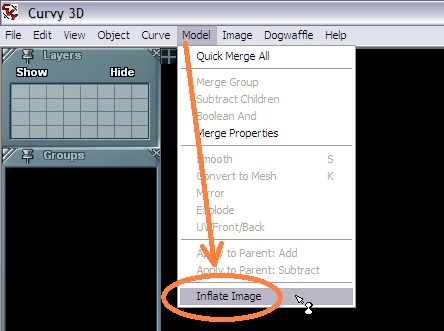
There are a bunch of parameters that will appear in the dialog. Ignore
them for now. Focus first on selecting the image file. Click the
Image... button in the lower left of the dialog.

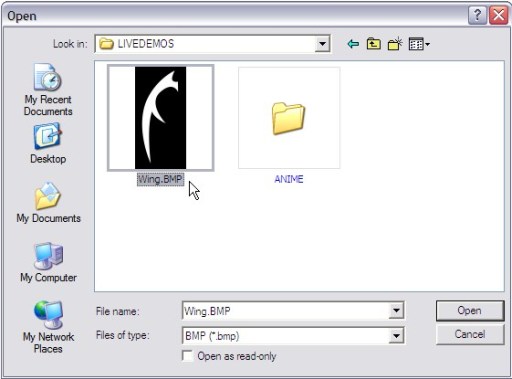
Find, select and open the image file, in this case Wing.BMP:
Back in the Inflate Image dialog, look at the two inflation modes:
Relief vs. Auto:
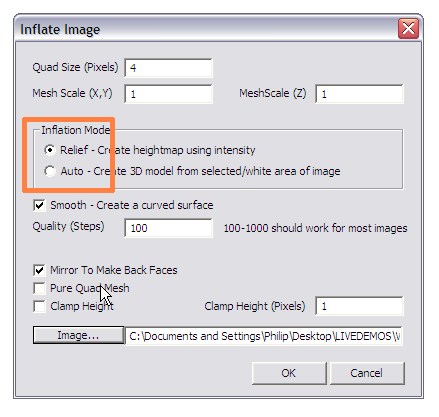
Either one of these will work, but the results will of course vary.
Let's have a look at both, starting with the default, the Relief mode.
Simply click OK to use the default values.
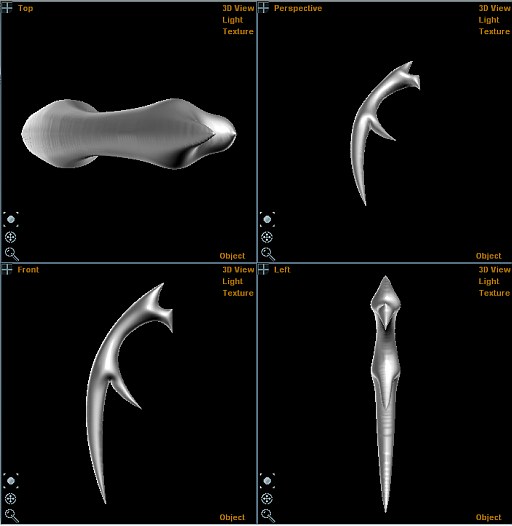
The resulting model is a long extruded block that uses the profile seen
in the image file.

If you use the other method: Auto...
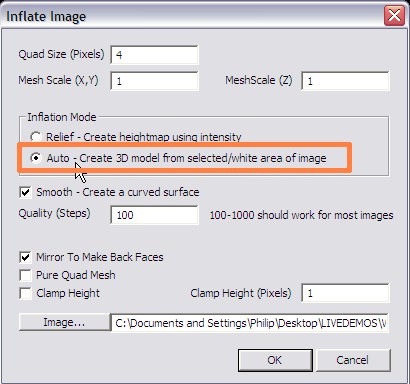
... it will attempt to create a blobby 3D shape like this one:
Either solution may work, and you may want to do some further
processing and transforming.
For example, let's resize the shape created in the first example, but
let's resize it only along one axis, so that we can reduce the
extrusion depth.
Click the Move tool and select the Scale tool from its menu.


If you don't use any keyboard modifiers, scaling will be uniform in all
3 axes. Instead, we will want to scale it only along one of the primary
axes.
To that effect, simply press and hold the desired key for the desired
axis. For example, Z for the Z axis, or X for the X axis. The Y axis is
up-down, and clearly we don't need this in that model.
In the Front view, the X axis goes left to right. In the Left view,
left-to-right therefore denotes the direction of the Z axis. So we'll
need the Z key.
Press and hold the Z key, and then click and drag the cursor in the
view, dragging it from right to left to reduce the size along that Z
axis.
You will see the depth of extrusion reduced.
In no time, you will have a thin blade suitable for a cutting weapon or
a set of wings.
You can also then apply the same original BMP image file as a bump map
or even displacement map (Curvy map), and apply additional different
textures to bump or color map, and further smooth and edit the shape..

Now that you have the basics of using Image Inflate to make a new
model, be sure to experiment with variations on those other parameters
seen earlier in the Image Inflate dialog window. Have fun modeling with
images!
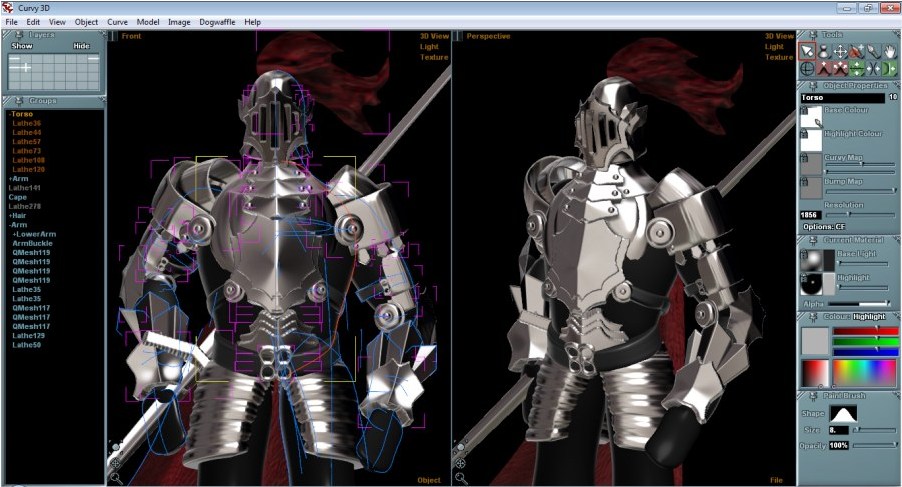
How far can you take this technique, you ask? Well, here is a model
that was assembled from multiple smaller pieces. Almost all parts were
created from a single image file containing multiple separated parts.
Image Inflate and Explode Image were used in this example:
|
|
|
Getting
started with Digital
Painting on a slim budget:

PD
Artist now
19!
Draw,
Sketch, Animate & Paint
powered
by Project
Dogwaffle
Can't afford
PD Artist at $19?

Someone
else is willing to pay for your copy of PD Artist, if you buy
something from them first - and there are many products and services to
choose from!
|
|
|