
PD Pro tutorials:

Post Work with
PD Pro
4.1: Adding
Frames to Extend the clip a few seconds on both ends
| more tutorials: |
| PD Pro |
| PD
Particles |
| more
PD |
| intro | part 1 | part 2 | part 3 |
part 4 |
part 5 |
part 6 |
part 7 |
part 8 |
| New
v1.5 Fast 3D sketching, colormap, bumpmap and displacement map painting and digital & sculpting: Curvy 3D the fun & intuitive way to sculpt!  ...it's not modeling, it's better: It's liberal sculpting! Great for Fantasy Art, Concept Art & 3D Design, making 3D props, ... Special discount coupons available for users of Project Dogwaffle! (ask us) |
| Right,
so now, we have the clip at the desired resolution (which might still
not be the final res.). For now, we see the animation abruptly start and come to a stop after a few seconds. It would be better if we had a few more spare frames, both at the start before the camera begins to move, as well as at the end after the last frame. This would give us for example room for transitions like fade overs without sacrificing the important frames which we want to see entirely.  You
can select the Filmstrip mode from the Options menu in the Animation
toolbar: You
can select the Filmstrip mode from the Options menu in the Animation
toolbar: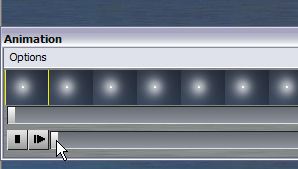 When
using Filmstrip mode, you'll see each frame as a small icon. When
using Filmstrip mode, you'll see each frame as a small icon.Select the first frame by either clicking it, or by scrolling to it on the scrub bar, or by using the Left arrow keys. The first frame should show with a yellow box highlight.  Hit the "+" key again a few times to insert
additional frames. Hit the "+" key again a few times to insert
additional frames.If you want a full second that's plauing at 30 fps, click the button 30 times. Or do this just 5-6 times, and then use the in and out markers to define a range of frames, and copy/paste the whole selected block of 6 frames at a time. That might get you there a little faster. After inserting a bunch of frames at the start, the animation will look a bit like this, with the first frame lasting 1-2 seconds longer, before the camera movement starts showing, if we inserted 30-60 frames in this manner. You can then repeat this process for the last frame, adding more frames as duplicates to it.  |
| intro | part 1 | part 2 | part 3 |
part 4 |
part 5 |
part 6 |
part 7 |
part 8 |