|

|
|
|
 |
Tutorial using the animated
waveing lua filter
|
|
|
|
Animated Flares and
Brush FX
|
|
|
Our original image from which we
built an animation had some amount of Halo and glow around the Sun.
With the swaying of the branches in front, you might now want to see
that glare break through in-between the branches.
PD Pro offers a few ways to create such animated flares with varying
streaks, and to further animate its size, opacity or orientation.
One convenient way is with the BrushFX tool.
|
|
|
You can open the BrushFX panel
from the Window menu, or from the Custom tab of the Brush settings
(keyboard shortcut 'o' for options).
 |
|
|
There is a long list of presets,
for animated flares, machine gun flares, flashlights, suns, etc...
Select the one named Flare_Movie.

You can change the base color of the flares, and a variety of
noise-related options are selectable too. There's also an Editor for
more parameters, but we'll take the easy route and skip this for now.
|
|
|
You can change the size of the
flare directly on the preview area, just like in the Custom tab of the
brush settings panel: Click in the middle and drag out to the desired
size, shown as a rubberband circle. When you let go of the mouse
button, the new flare will be shown again at the new size. You
can drag well outside of the preview area and make it much larger
that way.
 |
|
|
Add a little noise.

Then click the button "Create Animated..."
|
|
|
A new panel appears, with
sliders to indicate the speed of noise and the speed of changes in the
streaks. You can also set the desired number of frames. If the base
animation has 99 frames in this case, then we may want to set the same
count for this animated brush, although it is cdertainly possible to
use different counts and let the brush repeat its cycle if necessary to
render across all frames of the animation.
 |
|
|
Click the "Begin" button to
start rendering the sequence of frames for the animated flare. Note
that this can be a time-consuming process, especially with large
dimensions and high framecounts.

^click to
enlarge
|
|
|
When the rendering is completed,
be sure to store the newly created brush (which is at this time the
custom brush, and an animated one at that). Like earlier, use the
Store/manage... option in the Brush menu.
|
|
|
 |
|
|
The brush manager shows a
variety of options in the stored brush. Of particular interest here is
the last button at the bottom: Show Filmstrip.
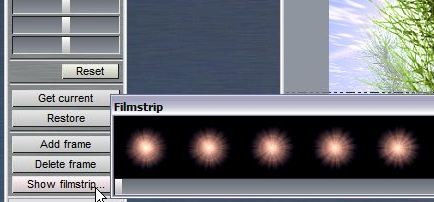
This shows the frame sequence of the animation stored in this custom
brush we created with BrushFX.
|
|
|

The animated Flare:
|
|
|
In the next part you'll again use the Brush Keyframer to render this
custom brush over the current animation. This time however we'll also
make changes to some of the parameters such as size or opacity, and set
keyframes so as to animate its appearance even beyond its animated
frame sequence.
|
|
|
|
part 1 < part 2 < part 3
> part
4 >
part 5 |
|
