|
Sample Lua Scripts.......
|
|
Ok, here are some filters,
for your enjoyment. Grab'em and experiment, play with
different parameters, etc...
|
|
|
|
Mirror - by Dan Ritchie
my first lua script. ok, it's not terribly complex.
Copy/Paste the text shown
here into the DogLua editing window >>>
or
save it to a .lua file to run it from the
DogLuaBrowser.
left: original
/ right: Mirror'ed
 > 
|
--
Mirror_by_Dan.lua
-- Mirror. Mirrors both horiz and vert...
for y = 0, height - 1 do
for x = 0, width - 1 do
x2=(width/2)-math.abs(x-(width/2))
y2=(height/2)-math.abs(y-(height/2))
r, g, b = get_rgb(x2, y2)
set_rgb(x, y, r, g, b)
end
progress(y / height)
end |
|
|
|
|
Sliders - by Marco Pontello
Here's a script that slides some rows (depending on a
random choice), refreshes the display and then repeats the
process a selected number of times. The resulting effect
maybe similar to something reflected on water, or something
like that.
Anyway, it is just to show how to put in a function for some
repeating blocks/process, ask for user input, commit the
buffers modification and update the display while continuing
the process.
Copy/Paste the text shown
here into the DogLua editing window >>>
or
save it to a .lua file to run it from the
DogLuaBrowser.
left: Slider'ed
/ right: Mirrored, Shifted,
Alpha-Slider'ed
(i.e. with use of Alpha channel mask to work on bottom
areas)
 > 
|
--
Sliders_by_Marco.lua
function slide(y)
back_r, back_g, back_g = get_rgb(0,y)
for x = 0, bound_x1 - 1 , 1 do
r, g, b = get_rgb(x + 1, y)
set_rgb(x, y, r, g, b)
end
set_rgb(width - 1, y, back_r, back_g,
back_g)
end
rep = Dog_ValueBox("Slider", "Repeat:", 1, 50, 5)
prob = Dog_ValueBox("Slider", "Probability:", 1,
20, 5)
counter = 0
maxcounter = rep * (bound_y1 - bound_y0)
for t = 1, rep, 1 do
for y = bound_y0, bound_y1, 1 do
c = math.random(prob)
if c == 1 then
slide(y)
end
counter = counter + 1
progress(counter / maxcounter)
end
flush()
Dog_Refresh()
end
-- |
|
|
|
|
Mirrored Frame - by Boris Eyrich
 shown with
permission by Boris Eyrich, Artweaver.de: shown with
permission by Boris Eyrich, Artweaver.de: |
 |
|
--
mirrored_frame.lua
FrameSize = 30
function InsideFrame(x,y)
if (x > FrameSize) and (x <
width-FrameSize-1) and
(y > FrameSize) and (y
< height-FrameSize-1) then
return 1
else
return 0
end
end
for y=0, height-1 do
for x=0, width-1 do
if InsideFrame(x,y) == 0 then
r,g,b,a =
get_rgba(width-x-1,height-y-1)
else
r,g,b,a =
get_rgba(x,y)
end
set_rgba(x,y,r,g,b,a)
end
progress (y/height)
end
|
|
|
|
|
Sharpen Luminance, by Dan Ritchie
This lua script applies a sharpen convolution to the
luminance channel of an image. Save the script as
Sharpen_Luminance.lua
This script will give you a somewhat better sharpen than the
regular sharpen convolution. The digital photo enhance
filter will still generally give you better results, but use
this if you need more extreme sharpening.
  Sharpen_Luminance, before (l.) and after (r.)
|
-- Sharpen_Luminance.lua
-- apply a sharpening convolution to the value
channel.
kernel = { { -1, -1, -1},
{ -1, 12, -1},
{ -1, -1, -1} }
divisor = 4
offset = 0
function filter (x,y)
local i, j, sum, v2 , dummy1, dummy2
sum = 0
for i=-1,1 do
for j=-1,1 do
dummy1,dummy2,v2=get_hsv(x+i, y+j)
sum = sum + (kernel[j+2][i+2] * v2)
end
end
return (sum / divisor) + offset
end
for y=bound_y0, bound_y1-1 do
for x=bound_x0, bound_x1-1 do
h,s,v =
get_hsv(x,y)
v = filter
(x,y)
set_hsv
(x,y,h,s,v)
end
progress
((y-bound_y0)/(bound_y1-bound_y0))
end
|
|
|
|
Elevation, by Marco Pontello
|
-- Elevation
-- "raise" a pixel diagonally depending on its
value
function elevate(x, y, h)
local i
r, g, b = get_rgb(x, y)
v = get_value(x, y)
for i = v * h, 1, -1 do
set_rgb(x+i, y-i, r, g, b)
end
end
factor = Dog_ValueBox("Elevation", "Factor:", 1,
100, 30)
if factor > 0 then
for y = bound_y0, bound_y1 do
for x = bound_x1, bound_x0, -1
do
elevate(x, y,
factor)
end
progress((y - bound_y0) /
(bound_y1 - bound_y0))
end
end
|
|
|
|
HAM (Hold and Modify) - remember the Amiga
days?
by Dan Ritchie and Marco Pontello
The Ham script simulates the Amigas HAM (Hold
and Modify) screen mode.
Install the .lua script and the bmp file in your
DogLuaScripts folder. Place the exe files in the
folder where Dogwaffle is installed, if you do not already
have them.
It is assumed that DogLua and the GUI_Server application are
already installed.
download: HamGUI_lua.zip (21.7 KB (22,321
bytes))
This scripts comes with a choice of 4 dithering modes:
Floyd
Halftone
Random
None
Here is an example of the effect, with no dithering:
original image: Plasma noise (level 7) -
click image for larger version
modified image: HAM (dithering = None) - click
image for larger version
Usage in 3D: Sandicastle 'terraced' terrain elevation
map
The quantization produces nifty maps that can be used like
elevation maps for 3D terrain generation such as the one
found in Carrara Studio
3:
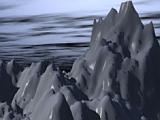 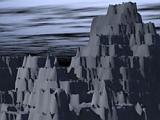 before and after HAM effect: making sand castle
mountains
before and after HAM effect: making sand castle
mountains
click images for larger views
|
-- HAM
-- Simulate the H.A.M. (Hold And Modify)
-- mode of the Amiga's Days!
-- some functions...
-- Determine the greater value of 3
function max_p(x1, x2, x3)
local v
if x1 > x2 then
if x1 > x3 then
v = 1
else
v = 3
end
else
if x2 > x3 then
v = 2
else
v = 3
end
end
return v
end
-- Quantize each component in 4bit range
function quantize(x)
x = math.floor(x/16) * 16
return x
end
-- begin main program...
GUI_SetCaption("Ham")
GUI_AddLogo("HamLogo.bmp")
--setup a combo box
h1 = GUI_AddControl("Combobox", "Dithering")
--set the list in the combo box
GUI_SetList (h1,0,"Floyed")
GUI_SetList (h1,1,"Halftone")
GUI_SetList (h1,2,"Random")
GUI_SetList (h1,3,"None")
--set the current string in the combo box
GUI_SetSettings (h1,0, "Floyed")
GUI_OpenPanel()
repeat
idx, retval, retstr = GUI_WaitOnEvent()
until idx < 0
-- if OK was pressed.
if (idx==-1) then
h1_value, h1_string = GUI_GetSettings (h1)
--dither the image using and existing plugin
if h1_string =="Floyed" then
Dog_ShellExe("12_bit_dither_pf.exe")
Dog_GetBuffer()
end
if h1_string =="Halftone" then
Dog_ShellExe("12_bit_halftone_pf.exe")
Dog_GetBuffer()
end
if h1_string =="Random" then
Dog_ShellExe("12_bit_random_pf.exe")
Dog_GetBuffer()
end
for y = bound_y0, bound_y1 do
-- Start with black at every scanline
lr = 0
lg = 0
lb = 0
for x = bound_x0, bound_x1 do
r, g, b = get_rgb(x, y)
r=r*255
g=g*255
b=b*255
r = quantize(r)
g = quantize(g)
b = quantize(b)
r=r/255
g=g/255
b=b/255
-- Calculate the difference with last pixel
dr = math.abs(r - lr)
dg = math.abs(g - lg)
db = math.abs(b - lb)
-- Change only the most different component
v = max_p(dr, dg, db)
if v == 1 then
lr = r
elseif v == 2 then
lg = g
else
lb = b
end
set_rgb(x, y, lr, lg, lb)
end
progress((y - bound_y0) / (bound_y1-bound_y0))
end
end
GUI_ClosePanel() |
|
Value-only Contrast
(by Dan Ritchie)
Here's another super simple script that's actually
useful. It
increases the contrast of an image without changing the
colors.
|
-- ValueOnly_contrast.lua
-- value only contrast -keep colors the same.
contrast = Dog_ValueBox("Contrast",
"0-49
less. 51-100 more.", 0, 100, 50)
-- 0-1 will reduce contrast
-- 1-2 will increase contrast
contrast=(contrast/50)
for y = 0, height - 1 do
for x = 0, width - 1 do
y2, u, v = get_yuv(x, y)
y2=((y2-.5)*contrast)+.5
set_yuv(x, y, y2, u, v)
end
progress(y / height)
end
|
|
NV - Night Vision like
effect
|
--NV.lua
-- Night vision like effect.
-- uses the saturation channel,
-- so it won't work with greyscale images.
for y = 0, height - 1 do
for x = 0, width - 1 do
r, g, b = get_hsv(x, y)
b=1-b
b=b+(math.random()-.5)/5
if b<0 then
b=0
end
if b>1 then
b=1
end
set_rgb(x, y, 0, b, 0)
end
progress(y / height)
end
|
|
Soften_Chroma
|
--
Soften_Chroma.lua
-- apply a box filter to the U anv V channels.
-- based on the 3x3 convolution filter example
kernel = { { 1, 1, 1},
{ 1, 1, 1},
{ 1, 1, 1} }
divisor = 9
offset = 0
function filter (x,y)
local i, j, sum, sum2
sum = 0
sum2= 0
local y2, u,v
for i=-1,1 do
for j=-1,1
do
y2,u,v=get_yuv(x+i,
y+j)
sum = sum + (kernel[j+2][i+2] * u)
sum2 = sum2 + (kernel[j+2][i+2] * v)
end
end
return (sum / divisor) + offset,
(sum2 / divisor) + offset
end
for y=bound_y0, bound_y1-1 do
for x=bound_x0, bound_x1-1 do
y2,u,v=
get_yuv(x,y)
u,v = filter
(x,y)
set_yuv
(x,y,y2,u,v)
end
progress
((y-bound_y0)/(bound_y1-bound_y0))
end
|
|
DesatGrad_YUV
|
--
DesatGrad_YUV (looks better than HSV version)
-- Desaturate gradient
for y = 0, height - 1 do
for x = 0, width -1 do
h, s, v = get_yuv(x, y)
s = s * (x / width)
set_yuv(x, y, h, s, v)
end
progress(y / height)
end |
|
Channels_HSV_to_RGB
|
--
Channels_HSV_to_RGB.lua
for y = 0, height - 1 do
for x = 0, width - 1 do
r, g, b = get_rgb(x, y)
set_hsv(x, y, r, g, b)
end
progress(y / height)
end
|
|
Channels_rgb_to_hsv
|
--Channels_rgb_to_hsv.lua
for y = 0, height - 1 do
for x = 0, width - 1 do
r, g, b = get_hsv(x, y)
set_rgb(x, y, r, g, b)
end
progress(y / height)
end
|
|
replace_a_color
(see below for another
version with range (margin) and user interface)
This version doesn't use any GUI components.
You can specify each color channel as a normalized
floating point value (0.0 to 1.0) . So if you're used to
values from 0 (integer) to 255 simply take your value
and divide it by 255.0
Of course the script could be changed instead, to accept
user data ranging from 0 to 255. See the next script for
an example.
|
--
-- color_search_and_replace
--
-- replace all pixels of a given 'bad' color
-- with a partyicular new color. The bad color is
-- defined by an r/g/b triplet.
-- ...looking for this 'bad' color. Note that
colors in
-- gluas are ultimately normalized in the range
between
-- 0.0 and 1.0. If however you like to think of
-- a color as a byte-value between 0 and 255 then
-- you could divide that value by 255 to normalize
it to
-- a range of 0.0 to 1.0
-- for example: LOOKING FOR BLACK (zero in r/g/b
each)
bad_r = 0.0
bad_g = 0.0
bad_b = 0.0
-- ...and to replace it with this 'new' color:
-- for example change to red (1.0 in r channel
only)
new_r = 1.0
new_g = 0.0
new_b = 0.0
-- now go through all pixels, check their value,
and if it's
-- a match then replace it with the new color
for y = 0, height - 1 do
for x = 0, width - 1 do
-- get the rgb values of the current pixel
r, g, b = get_rgb(x, y)
-- check if it's the same as the 'bad' color we're
looking for
-- it's most likely not the case so we're looking
one
-- by one in order to avoid needless tests
if r == bad_r then
if g == bad_g
then
if b == bad_b then
set_rgb(x, y, new_r, new_g, new_b)
end
end
end
end
progress(y / height)
end
|
|
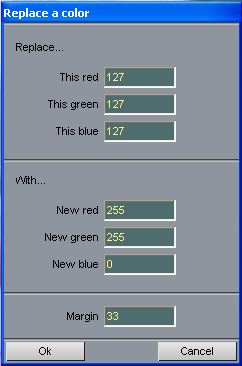
replace_a_color_range
Similar
to the prior script, but this one also lets you
specify a margin. If a pixel is found to be of the
same color or within the margin then it gets
replaced with the new color.
In this example,
the colors are specified as 8-bit integers
ranging from 0 to 255. The script then normalizes
the values to what's needed.
Below are a few
examples :
(with various settings, not necessarily the
user options seen here to the right):

original image
 ... further modified
with blurring... ... further modified
with blurring...
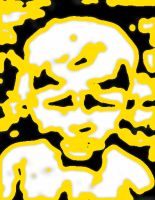
... and finally
replacing the blurred grey values with yellow. The
prior blurring causes transitions between the
original black and white. The range can be set to
replace most of the greys with this one yellow
color. |
--
-- replace_a_color_range
--
-- by Philip Staiger, thebest3d.com
--
-- Description:
-- replaces all pixels of a given 'bad' color
-- with a particular new color. The bad color is
-- defined by an r/g/b triplet and a margin, so
-- that colors within a range will qualify also.
-- ...looking for this 'bad' color. Note that
colors in
-- gluas are ultimately normalized in the range
between
-- 0.0 and 1.0. If however you like to think of
-- a color as a byte-value between 0 and 255 then
-- you could divide that value by 255 to normalize
it to
-- a range of 0.0 to 1.0
--
-----------------------------------------------------
-- YOUR USER DATA GOES HERE:
--
-----------------------------------------------------
-- looking for what color? (use range: 0 ...
255)
THIS_RED = 127
THIS_GREEN = 127
THIS_BLUE = 127
-- The margin (use range: 0 .. 255)
MY_MARGIN = 33
-- Desired replacement color:
NEW_RED = 255
NEW_GREEN = 255
NEW_BLUE = 0
-- ------------
-- Simple GUI
-- ------------
GUI_SetCaption("Replace a color")
GUI_AddControl("Textlabel", "Replace...")
h1 = GUI_AddControl("Number", "This red",
THIS_RED)
h2 = GUI_AddControl("Number", "This green",
THIS_GREEN)
h3 = GUI_AddControl("Number", "This blue",
THIS_BLUE)
GUI_AddControl("Line")
GUI_AddControl("TextLabel","With...")
h5 = GUI_AddControl("Number", "New red", NEW_RED)
h6 = GUI_AddControl("Number", "New green",
NEW_GREEN)
h7 = GUI_AddControl("Number", "New blue",
NEW_BLUE)
GUI_AddControl("Line")
h4 = GUI_AddControl("Number", "Margin", MY_MARGIN)
GUI_OpenPanel()
repeat
idx, retval, retstr = GUI_WaitOnEvent()
until idx < 0
if idx==-1 then
THIS_RED = GUI_GetSettings(h1)
THIS_GREEN = GUI_GetSettings(h2)
THIS_BLUE = GUI_GetSettings(h3)
MY_MARGIN = GUI_GetSettings(h4)
NEW_RED = GUI_GetSettings(h5)
NEW_GREEN = GUI_GetSettings(h6)
NEW_BLUE = GUI_GetSettings(h7)
-- here we go...
-- normalize the user value to a range from
-- 0.0 to 1.0 as that's what lua uses.
bad_r = THIS_RED / 255.0
bad_g = THIS_GREEN / 255.0
bad_b = THIS_BLUE / 255.0
--
-----------------------------------------------------
-- DON'T CHANGE THINGS BELOW THIS LINE
--
-----------------------------------------------------
-- normalizing the margin of error:
margin = MY_MARGIN / 255.0
-- ...and to replace it with this 'new' color:
-- for example change to red (1.0 in r channel
only)
new_r = NEW_RED / 255.0
new_g = NEW_GREEN / 255.0
new_b = NEW_BLUE / 255.0
-- determine the valid ranges: low and high limits
--
for
red, green and blue
-- make sure the range is not causing overflow
-- or underflow beyond the legit range of colors
-- from 0.0 to 1.0
r_lo = bad_r - margin
if r_lo < 0.0 then
r_lo = 0.0
end
r_hi = bad_r + margin
if r_hi > 1.0 then
r_hi = 1.0
end
g_lo = bad_g - margin
if g_lo < 0.0 then
g_lo = 0.0
end
g_hi = bad_g + margin
if g_hi > 1.0 then
g_hi = 1.0
end
b_lo = bad_b - margin
if b_lo < 0.0 then
b_lo = 0.0
end
b_hi = bad_b + margin
if b_hi > 1.0 then
b_hi = 1.0
end
-- now go through all pixels, find out if it's
-- within the range and if so replace the color
for y = 0, height - 1 do
for x = 0, width - 1 do
r, g, b = get_rgb(x, y)
if (r > r_hi) or (r <
r_lo) or (g > g_hi) or
(g < g_lo) or (b > b_hi) or (b <
b_lo) then
else
set_rgb(x, y, new_r, new_g, new_b)
end
end
progress(y / height)
end
end
-- voila
|
|
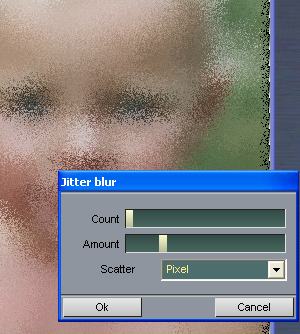
Jitter Blur (with GUI)
|
--
Jitterblur_Gui.lua
function DoJitter(count,amount)
edge_duplicate=1
local x,y
--math.randomseed(1)
for y = 0, height-1 do
for x = 0, width-1 do
local
hsum,ssum,vsum=0,0,0
local nx,ny,h,s,v,dummy
for n=1,
count do
nx=x+(math.random()-0.5)*amount
ny=y+(math.random()-0.5)*amount
h,s,v= get_rgb(nx,ny)
hsum,ssum,vsum=hsum+h,ssum+s,vsum+v
end
set_rgb (x,y,
hsum/count,ssum/count,vsum/count)
end
progress(y/height)
end
progress(0)
end
function DoJitterRGB(count,amount)
edge_duplicate=1
local x,y
--math.randomseed(1)
for y = 0, height-1 do
for x = 0, width-1 do
local
hsum,ssum,vsum=0,0,0
local nx,ny,h,s,v,dummy
for n=1,
count do
nx=x+(math.random()-0.5)*amount
ny=y+(math.random()-0.5)*amount
h,dummy,dummy= get_rgb(nx,ny)
nx=x+(math.random()-0.5)*amount
ny=y+(math.random()-0.5)*amount
dummy,s,dummy= get_rgb(nx,ny)
nx=x+(math.random()-0.5)*amount
ny=y+(math.random()-0.5)*amount
dummy,dummy,v= get_rgb(nx,ny)
hsum,ssum,vsum=hsum+h,ssum+s,vsum+v
end
set_rgb (x,y,
hsum/count,ssum/count,vsum/count)
end
progress(y/height)
end
progress(0)
end
function DoJitterHSV(count,amount)
edge_duplicate=1
local x,y
--math.randomseed(1)
for y = 0, height-1 do
for x = 0, width-1 do
local
hsum,ssum,vsum=0,0,0
local nx,ny,h,s,v,dummy
for n=1,
count do
nx=x+(math.random()-0.5)*amount
ny=y+(math.random()-0.5)*amount
h,dummy,dummy= get_hsv(nx,ny)
nx=x+(math.random()-0.5)*amount
ny=y+(math.random()-0.5)*amount
dummy,s,dummy= get_hsv(nx,ny)
nx=x+(math.random()-0.5)*amount
ny=y+(math.random()-0.5)*amount
dummy,dummy,v= get_hsv(nx,ny)
hsum,ssum,vsum=hsum+h,ssum+s,vsum+v
end
set_hsv (x,y,
hsum/count,ssum/count,vsum/count)
end
progress(y/height)
end
progress(0)
end
function DoJitterYUV(count,amount)
edge_duplicate=1
local x,y
--math.randomseed(1)
for y = 0, height-1 do
for x = 0, width-1 do
local
hsum,ssum,vsum=0,0,0
local nx,ny,h,s,v,dummy
for n=1,
count do
nx=x+(math.random()-0.5)*amount
ny=y+(math.random()-0.5)*amount
h,dummy,dummy= get_yuv(nx,ny)
nx=x+(math.random()-0.5)*amount
ny=y+(math.random()-0.5)*amount
dummy,s,dummy= get_yuv(nx,ny)
nx=x+(math.random()-0.5)*amount
ny=y+(math.random()-0.5)*amount
dummy,dummy,v= get_yuv(nx,ny)
hsum,ssum,vsum=hsum+h,ssum+s,vsum+v
end
set_yuv (x,y,
hsum/count,ssum/count,vsum/count)
end
progress(y/height)
end
progress(0)
end
-- the main program.
Dog_SaveUndo()
GUI_SetCaption("Jitter blur")
h1 = GUI_AddControl("Scroller", "Count", 1, 1, 10)
h2 = GUI_AddControl("Scroller", "Amount", 10, 1,
100)
h3 = GUI_AddControl("Combobox", "Scatter")
GUI_SetList (h3,0,"Pixel")
GUI_SetList (h3,1,"RGB separately")
GUI_SetList (h3,2,"HSV separately")
GUI_SetList (h3,3,"YUV separately")
GUI_SetSettings (h3,0, "Pixel")
GUI_OpenPanel()
--event loop. Repeat until ok or cancel
pressed (index of -1 or -2)
repeat
idx, retval, retstr = GUI_WaitOnEvent()
count,string=GUI_GetSettings(h1)
amount,string=GUI_GetSettings(h2)
dummy,type=GUI_GetSettings(h3)
if (idx>-1) then
if type=="Pixel" then DoJitter (count,amount) end
if type=="RGB separately" then DoJitterRGB
(count,amount) end
if type=="HSV separately" then DoJitterHSV
(count,amount) end
if type=="YUV separately" then DoJitterYUV
(count,amount) end
Dog_Refresh()
end
until idx < 0 --repeat until
GUI_ClosePanel()
if idx == -2 then
--Restore the image
Dog_RestoreUndo()
Dog_GetBuffer()
end
|
|
| Channels_RGB_to_CMY_cyan |
--
Channels_RGB_to_CMY_cyan.lua
-- Convert a RGB image to cyan
local x, y, r, g, b
local c2,m2,y2,av
for y = 0, height - 1 do
for x = 0, width - 1 do
r, g, b = get_rgb(x, y)
c2=r
m2=1
y2=1
set_rgb(x, y, c2, m2, y2)
end
progress(y / height)
end
|
|
| Channels_RGB_to_CMY_magenta |
--
Channels_RGB_to_CMY_magenta.lua
-- Convert a RGB image to magenta?
local x, y, r, g, b
local c2,m2,y2,av
for y = 0, height - 1 do
for x = 0, width - 1 do
r, g, b = get_rgb(x, y)
c2=1
m2=g
y2=1
set_rgb(x, y, c2, m2, y2)
end
progress(y / height)
end
|
|
| Channels_RGB_to_CMY_yellow |
--
Channels_RGB_to_CMY_yellow.lua
-- Convert a RGB image to Yellow?
local x, y, r, g, b
local c2,m2,y2,av
for y = 0, height - 1 do
for x = 0, width - 1 do
r, g, b = get_rgb(x, y)
c2=1
m2=1
y2=b
set_rgb(x, y, c2, m2, y2)
end
progress(y / height)
end
|
|
| Dynamic Range |
-- Dynamic
Range.lua
-- expand the dynamic range to the full 8 bit
range.
local x, y, r, g, b,min,max,mu
--find the min and max values in the image
min=256
max=-1
for y = 2, height - 3 do
for x = 2, width - 3 do
r, g, b = get_rgb(x, y)
if r<min then min=r end
if r>max then max=r end
if g<min then min=g end
if g>max then max=g end
if b<min then min=b end
if b>max then max=b end
end
progress((y / height)/2)
end
--now process the image
max=max-min
mu=1/max
for y = 0, height - 1 do
for x = 0, width - 1 do
r, g, b = get_rgb(x, y)
r=((r-min)*mu)
g=((g-min)*mu)
b=((b-min)*mu)
if (r>1) then r=1 elseif (r<0) then r=0 end
if (g>1) then g=1 elseif (g<0) then g=0 end
if (b>1) then b=1 elseif (b<0) then b=0 end
set_rgb(x, y, r, g, b)
end
progress(((y / height)/2) +.5)
end
|
|
| InvertValue |
-- InvertValue.lua
--Invert value (keeps color the same)
for y = 0, height - 1 do
for x = 0, width - 1 do
y2,u,v=get_yuv(x,y)
y2=1-y2
set_yuv(x, y, y2, u, v)
end
progress(y / height)
end
|
|
 DogLua:


 ... further modified
with blurring...
... further modified
with blurring...