New
v1.5
Fast
3D sketching, colormap, bumpmap and displacement map painting and
digital & sculpting:
Curvy 3D
the fun & intuitive way to
sculpt!
...it's not modeling, it's better:
It's
liberal sculpting!
Great for Fantasy Art, Concept Art & 3D Design, making 3D props, ...
Special discount coupons available for users of Project Dogwaffle! (ask
us)
|
Digital
Painting has never been
so much fun: Learn to
paint with Particle Brushes!

PD
Particles - $19
A fun companion for your
digital
photo image editor!
powered
by Project
Dogwaffle

|
Getting
started with Digital
Art on a tight budget?

PD
Artist - only $39
Draw,
Sketch, Animate & Paint
powered
by Project
Dogwaffle
|
|
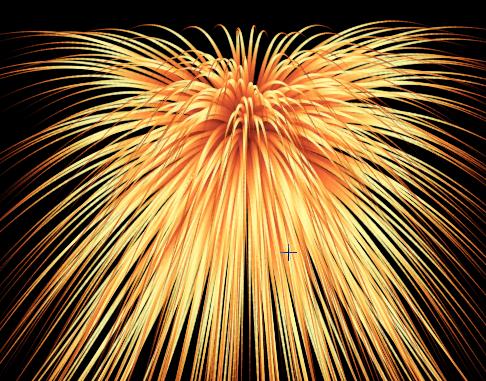
In this
tutorial you'll explore some more animated uses of particle
brushes, in particular for creating fireworks. Perhaps like this one:
Note that we offer additional
presets for particles in the freebies area. One of them has
parameters usable for fireworks, or for some types of waterfalls. In
any case, you should use them as starting points only, and customize
and learn how to make your own. Perhaps to add smoke, or small
particles in the mix.
|
|
Selecting
the Gradient
Your particles
used for fireworks will want to change colors over time. From dark to
bright and fading back to dark. Or starting bright and fading dark. And
perhaps changing colors, like the ones shown above: yellow to white
into green and darken to blue.
|

Use 'p' to open the gradients panel (or open it from the Window menu.
Click the 'Gradients' button in the lower-right of the panel. That will
let you choose other predefined gradient sets.
|

Select the set of red gradient sets:
Reds.grd
|

Use the slider in lower-left to scrub through the 8 gradients from this
set.
Number 3 looks like this. Could be a decent starting point for
particles used in fireworks (although we could do better with starting
brighter upfront. Feel free to customize the gradient you choose.
|

You want also want to change the Opacity: to make the particles fade to
transparent at the end
|

Use the cursorin the color area to reduce the level of opacity near the
right end.
|

Use the smoot tool (press and hold it) to smooth sudden drops and kinks.
|
Here's an example of the effect created with particles using that
gradient. They start as dark orange, turn white in the middle of their
lifespan, and turn orange and fade away towards the end. They also
change thickness, as they're using the style called Shrinking lines in
this example.
|
Using
the Brush Image and Parameters
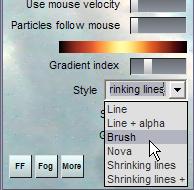 The
next trick is to use particles that are larger because they use images
that are larger and which don't shrink down in size. One easy way to do
this is by changing the particle's Style to 'Brush' The
next trick is to use particles that are larger because they use images
that are larger and which don't shrink down in size. One easy way to do
this is by changing the particle's Style to 'Brush'
Another Style that works for some firework effects too is Nova. Try it
later, and with small size, as they take a lot of time to render when
there are many particles.
|
So we have switched to the 'Brush' style. We now need to select the
brush we want to use along the particles. Use for example an airbrush
or a Simple brush, medium size.
 |
Draw a single brush stroke from lower-left to upper right with a bit of
an arching curve. Notice that the particles have been disabled when
selecting the medium brush.
 |
Now use Undo (shortcut Ctrl-Z or 'u' for undo), and re-enable the
particle system.
|

Get ready to draw the same with particles re-enabled: Check the
'Enabled' box in the particles panel.
|
And here's a first result: As you draw from llower-left to upper-right,
it shoots the particles as before, but now instead of thin lines or
shrinking lines, the thickness of the particle trails is controled by
the regular brush we selected.
 |
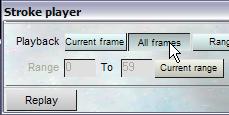 If
you have an animation ready to receive this, use undo and use the
Stroke player in "All Frames" mode. Click 'Replay' and the particles
will be re-rendered across all frames of your animation. If
you have an animation ready to receive this, use undo and use the
Stroke player in "All Frames" mode. Click 'Replay' and the particles
will be re-rendered across all frames of your animation.
|

And here's the animated result.
<
Click for larger version
|
Now try altering the parameters of the brush, such as :
- random position
- random size
- Mode (try Additive)
etc... and re-render the same brush stroke over the existing animation,
or over a new blank one.
|
more to come...
|
|
|
|
Skull by
Cybersign.de

larger version: 1600x1280
into 3D: draw
a shape, and see it
automatically turn it into 3D
Archipelis
Designer
cool
tool for rapid 3D model creation and prototyping from images
|
Inventory Blowout
Sale:

Poser 6 (boxed!) at
lowest prices:
for MacOs
or Windows
|
|


 more tutorials

