Digital
Painting has never been
so much fun: Learn to
paint with Particle Brushes!

PD
Particles - $19
A fun companion for your
digital
photo image editor!
powered
by Project
Dogwaffle

|
into 3D: draw
a shape, and see it
automatically turn it into 3D
Archipelis
Designer
cool
tool for rapid 3D model creation and prototyping from images
|
Getting
started with Digital
Art on a tight budget?

PD
Artist - only $39
Draw,
Sketch, Animate & Paint
powered
by Project
Dogwaffle
|
|
|
|
Selecting
the Back Region
|
|
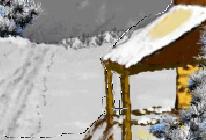
Our image contains a good part that shows the background sky with
clouds. We'll select that entire region with the lasso tool
The first row of icons in the Tools panel (below the larger 3
icons) contains the drawing tools: the brush, the rectangle, the
oval/circle and the fill tools. The second row contains several tools
for working with selections. They're called the Alpha tools because the
selection is stored in what's called the alpha channel.
The left-most alpha tool is the Lasso tool. You can use it plain and by
itself, or with the SHift key as a modifier. If you use Shift with left
mouse button to lasso, the new region in the lasso is added to the
current selection. If you use shift with the right button it lets you
subtract a selection from the current selection, to make holes for
example.

|
|
Using the Lasso tool, 'draw' the desired selection as a region around
the top sky area. You can start the selection 'outside' of the actual
image if you either zoom out or resized the window to reveal the grey
area around it.
|
|
Note that the first
selection pass is a large and not very precise region. No worries, we
can fine tune it if necessary.
For example, in the area shown below, the selection (marching ants
line) is way above the intended separation from white mountains and
dark skies.
You can draw another selection to capture the missing pieces, making
sure that you use the SHIFT key while drawing the region with the left
mouse button. This will 'add' the new region to the current selection.
You can use the zoom tool in the tool panel (4th row of tools in the
Tools panel - nested boxes). Or you can use SHIFT-Control and left or
right mouse drag topan and zoom without moving away from the work. This
is faster and avoids the travel to and from the interface: use both
hands: left hand on Control-Shift and right hand on the mouse to Pan
and Zoom through the image details.
 |
Here's a snapshot of the new region being defined. You notice that the
prior marching ants are still showing while we're drawing the new
outline which we want to add. SHIFT key is pressed down all the time
during this.
|
Storing
the Selection from Alpha
If you accidentally clear the prior selection, use Ctrl-Z or 'u' to
undo and return to the good selections.
Of course, just like storing the image buffer's RGB channel from
menu:Image>Store..., it would be very smart to occasionally store a
snapshot of the selection found in the alpha channel.
Use the menu: Alpha > Store alpha...
|
Here's an example of the stored selection. You can invert it, paint on
it, smudge it and put it back into the active alpha channel (Replace)
or add or subtract it from that.

You can also grab (Get) the current alpha to show as stored here, or
get the image buffer and convert it straight into this greyscale
rendition for future possible use as alpha. This is a very
powerful tool.
The reason for all this is that we want to have easy access to this and
a few other masks. By having them selected in alpha and stored in their
own snapshots we can simply click 'Replace' on the one we want at any
given time.
|
Adding
more to the Selection
It's time to add more. The background (sky region) is still
selected, let's add the middleground: hills and trees, but not the
house.
Use SHIFT again while defining the additional regions to be added to
the current selection. (we're still using the Lasso tool)
 |
Under theside roof and between the pilars there are some small areas
that we should also add to the new selection.
|
Zoom in and define the additional regions to be selected.
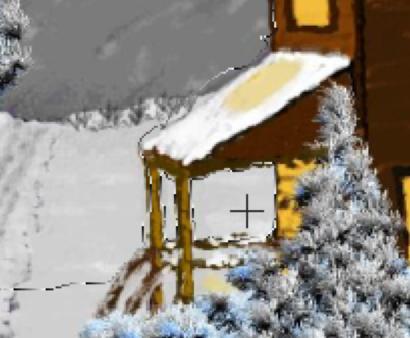 |
Store the new
selection. Now the house and nearby foreground grassy area is all
that's not selected yet:
|
 |
|
Next: Blurring the
selection in Alpha
|
|
|
|
|
|
|
|


