|
|
 |
|
||||||||
|
|
||||||||||
 |
Scratch Me -
the tutorial step 2 - creating the front animation |
tutorial start |
||||||||
|
||||||||||
|
|
||||||||||
| Creating
the Front Animation With the desired 'front' image loaded ('scratch me now' message), go to the Animation menu and select 'Create' menu: Animation > Create... |
||||||||||
 |
||||||||||
|
Select the desired frame count. This is a function of how long you want that scratching animation to last and at what frame rate it will play. For our example, let's assume it will play at 30 frames per second and needs to last 3 seconds. There may be additional time thereafter once the scratching is completed, but will worry about this a bit later. Likewise, if we need frames before the start of the scratching, we can insert them later. For now, let's focus on just the phase where scratching starts, and through the last frame of it. A total of 90 frames should do well for 3 seconds at 30 fps Enter 90 for the frame count (Frames) |
|||||||||
 |
||||||||||
| The 'Initialize' parameter needs
to Copy the current frame. That way each frame will carry that original
message. |
||||||||||
That's it - the placeholder for the animation consisting of 90 frames is ready, Next, select a brush and color... |
||||||||||
Selecting a Color and Brush  Be sure to select a blue color, since we'll use bluescreening when compositing the two images through their respective animation sequences. |
||||||||||
 Next, right-click on the brush selection tool to pick a pre-defined (internal) brush, nless you want to make your own custom brush. There are many ways to approach this. |
|
|||||||||
 One that may work well for a lottery scratcher ticket is the Rake brush, parts of the Tempera collection of brushes. |
||||||||||
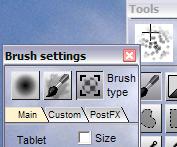
 Be sure to understand the many brush options (brush settings) associated with this brush. Left click on the thumbnail upper-left which shows the brush's image. Or, use the 'o' shortcut (o for options) |
||||||||||
|
 Here's a look at the brush settings for the Rake brush. The Opacity is a bit too low, you may want to yank it up higher, if the scratching action is to show crisp see-through results. Also, there's probably no need for 'bleeding', so set the Bleed value to 0. Otherwise, expect some of the existing color to initially bleed through the brush's blue color. |
|||||||||
 Here's a first test dabble (single brush stroke). The opacity was still too low, so you can see through the blue paint and still see a little bit of the original message. That has to change. |
||||||||||
| Here's another place where you
can set the Opacity, if using PD Pro 4.1 - there's a shortcut near the
top of the application window, below the menu bar. Set the opacity to the max.  |
||||||||||
 Now we're talking! |
||||||||||
|
|
||||||||||
| top |
step 1 |
step
2 |
step 3 |
step 4 |
step 5 |
step 6 |
step 7 |


